Bryce 5 - Tree Lab &
Landscape Generation
Carl E Schou
September 1, 2001
|
|
If you’ve used
Bryce in the past for any kind of landscape generation, you have
probably wrestled with the problem of how to produce a large
variety of realistic looking trees. The tree models included with
the software weren’t adjustable by the user and they lost
credibility in a close-up view. Corel has gone a long way to
remedy these problems with the new Tree Lab included in Bryce 5.
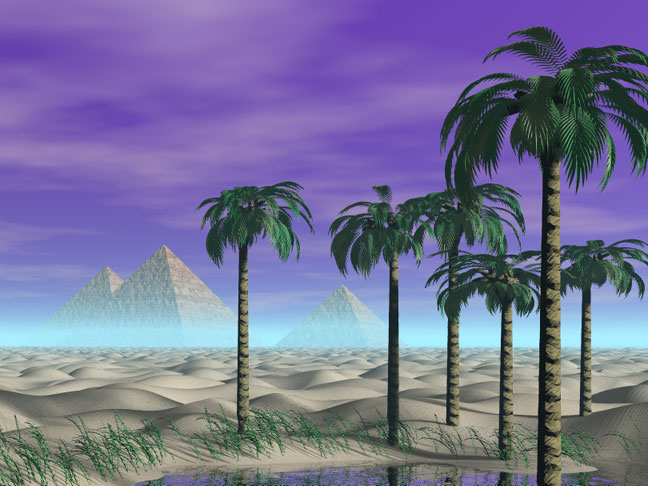
The picture at the top of this article "Palm Trees with
Pyramids" was produced with Bryce 5 using the Tree Lab and
the Terrain Editor. The grass around the oasis was generated with
Plant Studio2 and imported into Bryce. The picture was
rendered using the new Soft Shadows option in the Sky Lab.
This tutorial is arranged into four parts: (1) Using the Tree
Lab, (2) Assembling the picture, (3) a wish list of features that
I believe would enhance the performance of Bryce, and (4) Table 1
and Table 2 which are referred to through out the text. |
|
|
(1) USING THE TREE LAB
The Tree Lab lets the user choose
between 60 basic tree types. This controls the overall shape of
the finished tree. Parameters such as trunk thickness and the
branching angle can be customized to the needs of the project.
Each tree type has a corresponding texture applied to the bark. If
desired, the user can edit the bark texture or replace it with a
different texture. The user also selects the leaf type, size, and
color, and how the leaves are arranged on the branches.
For this tutorial, we’re going to make a grove of Palm Trees.
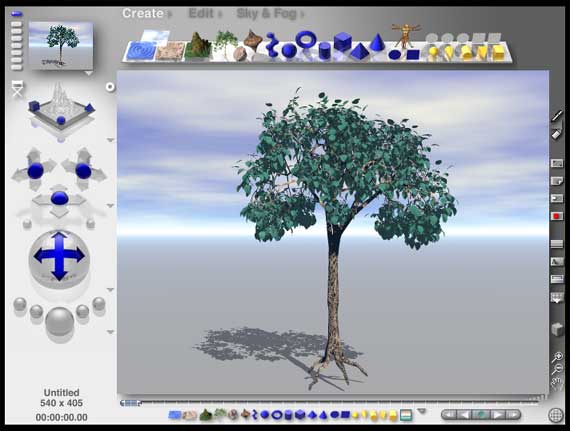
Start up Bryce and open the Create Palette. You’ll see a new
icon along the top of the screen – a tree. Click it and you’ll
have started your first Tree Lab tree. The screenshot below
shows a test render of the default tree. |
|
|
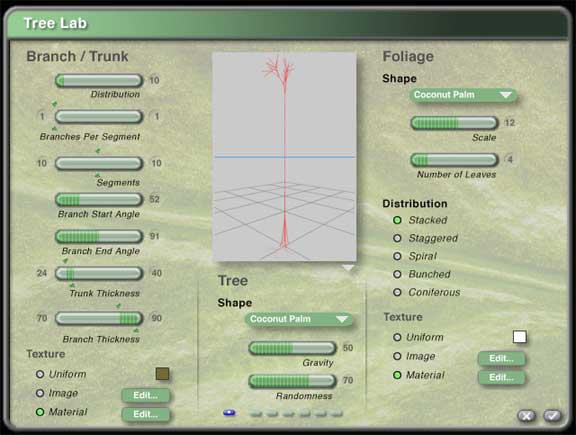
To edit the tree, make sure that it’s
selected and press CTRL+E to enter the Tree Lab. Two things
worth noting are the preview window and the Min/Max
controls. The little arrow under the preview window enables
a drop down menu which allows the user to update the preview and
to choose between a wireframe view and a rendered view. Some
of the controls use Min/Max sliders which allow two closely
related parameters to double up in a single control.
|
|
|
When you're through exploring, change your settings to match
the above screenshot to generate a palm tree. You'll want to
click on the Edit button next to "material" in the
Foliage section to make sure you're getting the leaf color you
want. A test render should look like the following image. |
|
|
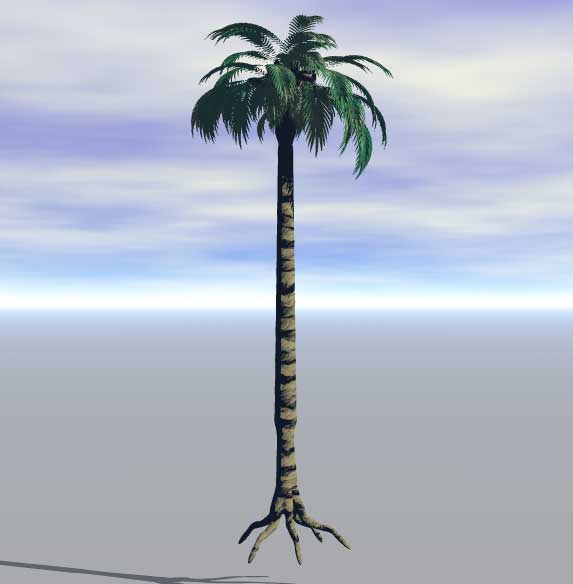
Nothing like a levitating, uprooted palm
tree to fuel a need for a landscape. To keep the tree safe
until it's needed again, assign it to Family 20, call it Tree1, and save your
work. |
|
|
(2) ASSEMBLING THE
PICTURE
Now it’s time to generate a landscape that the trees will be growing in. This
is done by creating a
terrain, modifying it in the Terrain Editor so it can be tiled, and tiling the terrain
out toward the horizon. A depression is created in the foreground
tile and filled with water to create the oasis. Grass is added
using Plant Studio. The Pyramids of Giza were modeled with simple
primitives, built to scale, and added to the background.
|
|
|
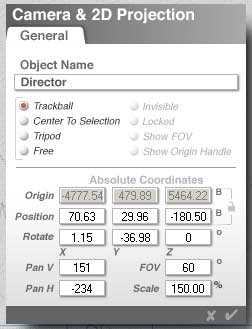
The Terrain
To get started with this portion of the
project, set up your camera as shown below.
|
|
|
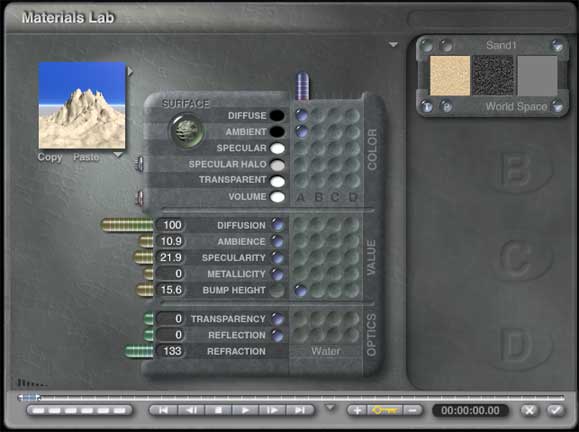
This project used a tiled terrain
generated entirely in Bryce. To start, create a terrain and click
the triangle next to Edit. Select "Riverbed" under the
"Rocks & Stones" materials library and click the
check mark to accept the material. Press CTRL+M to enter the
Materials Lab and
modify the default values to match the settings shown below.
|
|
|
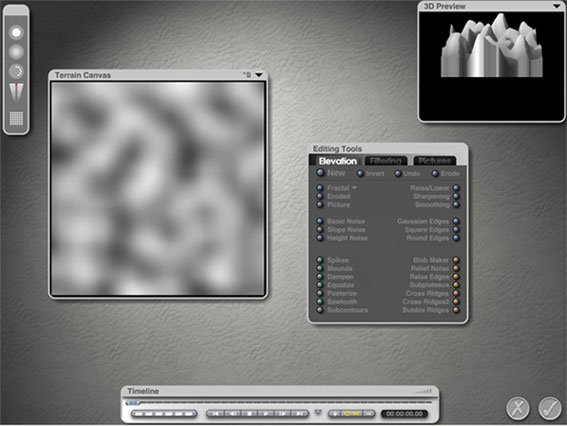
Press CTRL+E to go into the Terrain
Editor. Under Editing Tools click the little arrow to the right of
Fractal and select Perlin Hills. Now, start clicking the button to
the left of Fractal until you see something that looks like sand
dunes. Set the grid size high for the first tile because it’s
the closest one to the viewer. I used 2048 but you could probably
get by with less. If your machine has memory limitations,
use a grid size of 1024 or 512 and change the names of the sand
objects accordingly. Accept the terrain by clicking on the check
mark. |
|
|
Assign the terrain slab to Family 2 and call it Sand2048a.
Duplicate this terrain by entering CTRL+D. Assign the new terrain
to Family 3 and call it sand2048b. In the Edit Palette, click the
little triangle next to the size tool and select Flip X to mirror
the terrain around the Z axis. Similarly, duplicate sand2048b
and assign the new terrain to Family 5 and call it sand2048c. This
time select Flip Z to mirror around the X axis. Now select
sand2048a, duplicate it, assign the new terrain to
Family 6, and call it sand2048d. Select Flip Z. Using the
Attributes window for each of the four terrains, set the sizes and
positions as shown in Table 1. Congratulations, you’ve
made the first terrain tile. Using CTRL+D, copy sand2048a to
sand512a in Family 7. Enter the terrain editor and set the grid
size to 512. Likewise, copy sand2048b to sand512b, sand2048c to
sand512c, and sand2048d to sand512d and set their grid sizes to
512. Do the same to produce the 128 grid and the 64 grid tiles and
set the sizes and positions of all the tiles as shown in Table
1. When you’ve got it, save your work so you can get back to
this point if you have to. |
|
|
Next we will start copying the tiles and
moving each new tile out toward the horizon until they blend in
with the ground plane. Select the ground plane and apply the same
sand texture that was used for the terrains. Now, select all 4
terrains making up the 512 grid tile, group them together, and
assign them to family 7. Do the same with the 128 grid tile in
family 11 and the 64 grid tile in family 15.
Use CTRL+D to start
copying the sand512 tile, using the Attributes window to move each new tile by 400 in the
X or Y direction. As the tiles get farther away from the viewer,
switch to the lower grid sizes. If you've ever tiled a
floor, this will seem very familiar.
|
|
|
The Oasis
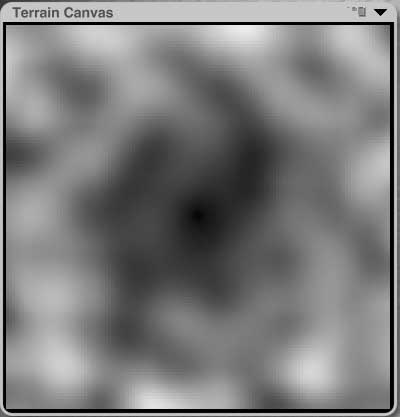
To make the oasis, select sand2048a and go into the terrain
editor. Press Invert and then Blob Maker to make a new hill in the
middle of the terrain. Press Invert again and sand2048a is
restored to its original shape except for a pit in its
middle. The terrain canvas with the pit added is shown
below.
Exit the Terrain Editor, select all 4 of the 2048 grid terrains, group
them together, and assign them to Family 2. Create a 2D Disk with
the values shown in Table 2 and apply a water texture to it.
Assign this disk to Family 6 and call it Water. |
|
|
The Grass
The grass around the oasis was created
in Plant Studio, a standalone program that generates 3D models of
a wide variety of plants. 27 different models of grass, each with
0 degrees of rotation, were generated in Plant Studio and exported
as 3DS files. These models were imported into Bryce as family 5
and kept ungrouped. After selecting family 5, the Attributes
window was opened (by clicking the little "A" in the box
next to the model) and the grass was rotated 90 degrees on the X
axis to correct the orientation after importing. After accepting
these values by clicking the check mark, the Multi-Replicate
window was opened by pressing ALT+SHIFT+D. The quantity was set to
5 with a rotation of 3 degrees on the Y axis. This resulted in a
total quantity of 162 plants whose orientations vary over a range
of 15 degrees.
|
|
|
To set the size and rough position of
the plants, all of the plants were selected and a top view was
chosen. In the Edit Palette, the overall scale of the plants was
decreased with the size tool until it looked right compared to the
palm trees. The plants were then moved to the side of the oasis
seen by the viewer in director view by using the position tool.
Still in the Edit Mode, 2D Disperse was chosen from the Randomize
Options and the little "amount" button was clicked and
dragged to spread out the grass. At this point, a check in
director view should show the grass dispersed in a flat horizontal
plane at some height above the ground. Keep all of the grass at
this height until you’re satisfied with its position from the
top view. If you change the height of any individual plants at
this time, you’ll have a very difficult time getting the height
of the plants to track the changing terrain altitude when you drop
the plants down to ground level later on. |
|
|
To fine-tune the position of the grass,
we need a reference picture of the oasis that we can refer to
while moving the grass. We also have to be able to select and move
grass individually and in clumps without affecting other objects
in the image. To do this, return to a top view and render the
image of the oasis. When this is complete, click twice on the
little cube on the lower right of your image. This should give you
your rendered image with the wireframe overlaid on top of it.
Select the oasis terrain slab, click on attributes, and select
"Locked". Do the same with the oasis water disk and the
ground plane. Now use the
mouse to select a clump of grass that is positioned where it
shouldn’t be (like over the water or too far from the water) and
move it to the edge of the oasis. When you are satisfied with the
arrangement of the grass, SAVE your work. |
|
|
To drop the grass onto the terrain,
change back to the Directors View, select all of the grass, and
click the down arrow icon appearing next to the bounding box. Each
grass object should drop down to the terrain. If you’re not
satisfied with the arrangement of the grass on the ground, then
select Revert to Saved in the File menu to restore the grass to
its original pre-dropped position. Repeat the render to make a new
reference image, and continue your landscaping work. When you’re
satisfied with the image in the Director’s View, save your work. |
|
|
Building the Pyramids
The original pyramids took years to make at a cost of untold
human suffering. Unless you’re a tyrant with thousands of people
who obey your every whim, you will probably be better off building
them in Bryce. Just create three pyramids using the values given
in Table 2. The texture applied was "Arizona",
from the Planes & Terrains materials library.
The values for the pyramids were found after a lot of digging
on the Internet. Their size was scaled up to match the
trees. The average height of a tree object in the Attributes
menu was 64. This is easily twice the height of the real
tree in feet, so I doubled the dimensions of the pyramids to keep
everything to scale. For this picture, one unit in Bryce = 6
inches. The viewpoint in the picture is from the southwest
of the pyramids, looking to the northeast, about 1600 feet from
the nearest pyramid (Menkaure). In case you're interested,
the names of the three pyramids are, from largest to smallest,
Khufu or Cheops, Khaefre or Chephren, and Menkaure.
|
|
|
Adding the Trees
Now that you have a suitable landscape built up, it's time to
add the trees. Select Tree1 and move it to a suitable
location using the Attributes window. Copy Tree1 using
CTRL+D, assign the new tree to Family 21, and call it Tree2.
Use the same process to create Trees 3, 4, 5, and 6. You can
use the tree positions given in Table 2 unless you see something
you think would look better. If the trees look too similar,
you can change the value of the randomness slider for each tree in
the Tree Lab. You can also change the rotation on the Y axis
so the tree presents its best side to the viewer.
|
|
|
Comparison between Hard & Soft
Shadows
The final image was rendered twice - once with
normal shadows and once with Soft Shadows enabled in the Sun and
Moon section of the Sky Lab under the Sky & Fog Palette.
The resulting Render Reports are shown below with normal shadows on
the left and soft shadows on the right.
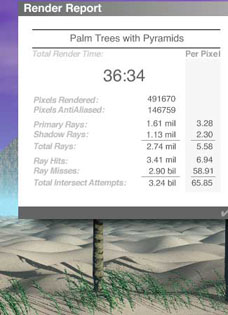
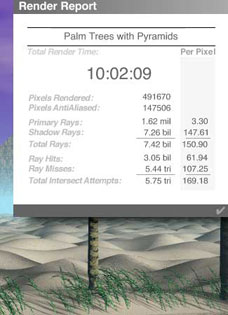
Rendering was done on a PC with an 850 MHz Athalon
processor and 768 MB of RAM. The file size was just under 200
MB with 1048 objects and 52442883 polygons.
|
|
|
(3) SUGGESTIONS FOR FUTURE UPGRADES TO BRYCE
I haven't walked through everything that's new in Bryce5, but
what I've seen so far looks good. The new soft shadow feature can
really enhance the realism of an image. The sharply outlined
shadows produced by earlier versions of Bryce could make an image
look overly stark unless a lot of care was taken. The new TreeLab
is a great addition. It can produce some nice results, but I wish
they'd taken it a little further. What follows is a wish list of
features that I’d like to see incorporated into a future version
of Bryce. |
|
|
Tree Lab Suggestions
Currently, tree trunks are straight. It would be great to add
the ability to bend tree trunks.
The joint between the root section and the trunk produces a
bulge near the bottom of the tree. If this could be minimized it
would help.
The ability to export the tree as a 3DS or OBJ file would allow
the user to paint or otherwise edit the tree before importing back
into Bryce for final rendering.
The user can determine the effects of gravity on the tree.
However, gravity appears to be defined as "down the length of
the trunk" rather than just "down". If a tree is
built with branches drooping due to gravity, and that tree is
rotated to give the appearance of a lean, the direction of the
droop rotates with the trunk rather than continuing to droop
toward the ground. This is really not a big problem since the user
can keep changing the randomness until the leaning tree looks
right. |
|
|
Soft Shadows Suggestion
Soft Shadows are terrific, but this option can only be turned
on or off in the Sky Lab under the Sky & Fog Palette. It would
be nice to have a control to vary the amount that the sharpness of
the shadows rolls off with distance. This option is already
available for lights but not for sunlight. |
|
|
Randomize Options Suggestion
The Randomize Options in the Edit Palette do not limit rotation
of a selected group of objects to a single 2D plane. It would be
nice to independently randomize position and rotation in any
plane. |
|
|
Terrain Editor Suggestion
It would be very helpful to be able to export the height map
image from the Terrain Canvas to a 2D file format like JPEG, BMP,
or PSD. This file could be edited in Photoshop, then pulled back
into Bryce’s Terrain Editor where it could be used to generate a
new terrain. |
|
|
Table 1 contains the positions and
offsets of the 1st generation terrain tiles before they are
grouped. Table 2 contains the positions, rotations, and
gains of the pyramids, water, trees, and grouped terrain tiles
before duplication and tiling across the landscape. |
|
|
Table 1
| Family |
Name |
Pos X |
Pos Y |
Pos Z |
Gain X |
Gain X |
Gain X |
| 1 |
default |
|
|
|
|
|
|
| 2 |
sand2048a |
0.00 |
10.12 |
0.00 |
200.25 |
20.00 |
200.25 |
| 3 |
sand2048b |
-200.00 |
10.12 |
0.00 |
200.25 |
20.00 |
200.25 |
| 4 |
lights |
|
|
|
|
|
|
| 5 |
sand2048c |
-200.00 |
10.12 |
200.00 |
200.25 |
20.00 |
200.25 |
| 6 |
sand2048d |
0.00 |
10.12 |
200.00 |
200.25 |
20.00 |
200.25 |
| 7 |
sand512a |
-400.00 |
10.12 |
0.00 |
200.25 |
20.00 |
200.25 |
| 8 |
sand512b |
-600.00 |
10.12 |
0.00 |
200.25 |
20.00 |
200.25 |
| 9 |
sand512c |
-600.00 |
10.12 |
200.00 |
200.25 |
20.00 |
200.25 |
| 10 |
sand512d |
-200.00 |
10.12 |
200.00 |
200.25 |
20.00 |
200.25 |
| 11 |
sand128a |
-800.00 |
10.12 |
0.00 |
200.25 |
20.00 |
200.25 |
| 12 |
sand128b |
-1000.00 |
10.12 |
0.00 |
200.25 |
20.00 |
200.25 |
| 13 |
sand128c |
-1000.00 |
10.12 |
200.00 |
200.25 |
20.00 |
200.25 |
| 14 |
sand128d |
-800.00 |
10.12 |
200.00 |
200.25 |
20.00 |
200.25 |
| 15 |
sand64a |
-1200.00 |
10.12 |
0.00 |
200.25 |
20.00 |
200.25 |
| 16 |
sand64b |
-1400.00 |
10.12 |
0.00 |
200.25 |
20.00 |
200.25 |
| 17 |
camera |
|
|
|
|
|
|
| 18 |
sand64c |
-1400.00 |
10.12 |
200.00 |
200.25 |
20.00 |
200.25 |
| 19 |
sand64d |
-1200.00 |
10.12 |
200.00 |
200.25 |
20.00 |
200.25 |
|
|
|
Table 2
| Family |
Name |
Pos X |
Pos Y |
Pos Z |
Rot X |
Rot Y |
Rot Z |
Gain X |
Gain Y |
Gain Z |
| 2 |
sand2048 |
-100 |
10.12 |
100 |
0 |
0 |
0 |
400.25 |
20 |
400.25 |
| 5 |
grass |
|
|
|
|
|
|
|
|
|
| 6 |
water |
0 |
4.50 |
0 |
0 |
0 |
0 |
200.00 |
0 |
200.00 |
| 7 |
sand512 |
-500 |
10.12 |
100 |
0 |
0 |
0 |
400.25 |
20 |
400.25 |
| 11 |
sand128 |
-900 |
10.12 |
100 |
0 |
0 |
0 |
400.27 |
20 |
400.27 |
| 15 |
sand64 |
-1300 |
10.12 |
100 |
0 |
0 |
0 |
400.30 |
20 |
400.30 |
| 16 |
pyramid 1 |
-8233 |
485 |
10253 |
180 |
-88.50 |
180 |
1511 |
970 |
1511 |
| 18 |
pyramid 2 |
-5855 |
477 |
8120 |
180 |
-88.50 |
180 |
1412 |
944 |
1412 |
| 19 |
pyramid 3 |
-3286 |
215 |
6612 |
180 |
-88.50 |
180 |
692 |
430 |
692 |
| 20 |
tree 1 |
-1.79 |
30.30 |
97.90 |
0 |
15 |
0 |
30.27 |
62.85 |
29.09 |
| 21 |
tree 2 |
-23.64 |
35.79 |
67.84 |
0 |
15 |
0 |
34.58 |
81.22 |
34.06 |
| 22 |
tree 3 |
28.04 |
35.92 |
-35.32 |
0 |
45 |
0 |
32.49 |
80.49 |
34.05 |
| 23 |
tree 4 |
-3.95 |
25.73 |
45.85 |
180 |
0 |
180 |
31.81 |
59.83 |
30.81 |
| 24 |
tree 5 |
-30.71 |
34.55 |
50.23 |
0 |
90 |
0 |
30.70 |
72.29 |
29.57 |
| 25 |
tree 6 |
-58.13 |
36.35 |
30.57 |
0 |
0 |
0 |
28.80 |
75.62 |
30.12 |
|
|
|
This tutorial started out as a brief
look at the Bryce 5 Tree Lab and it just grew from there. A
lot of the techniques covered here can be applied to other types
of projects in Bryce as well as other 3D applications. Good
luck with your landscaping work and enjoy. |
[RETURN TO TUTORIALS]
Copyright © 2000,
Authors Name, All Rights Reserved |