Real World DEM Landscapes and the Ground Control Importer - Carrara Studio 4 Tutorial
Carl E Schou
January 2005

Grand Canyon Overview
Landscape modeling is an art unto itself. Terrains made with grayscale height maps may be hand painted to put mountains where you want them. Random noise generators can be used to create the terrains, with the type of noise used having a pronounced effect on the character of the landscape. However, if you want to create an accurate scale computer model of land formations that exist in the real world, it's hard to beat the Digital Elevation Model (DEM).
For this tutorial, we are going to use the Ground Control plug-in from Digital Carvers Guild to import a DEM file from the Grand Canyon into Carrara. We will begin by taking a look at what DEM files are, then cover some sources for DEM files, before loading the files into Carrara and constructing a landscape.
The Background on DEMs
If you are familiar with topographic maps, then you already know most of what you need to understand DEM files. The map covers a specific area on the surface of the Earth, and it contains elevation information for each position. In the DEM file, the elevation for a given position on the terrain is stored in a raster format. The files are made available by the U.S. Geological Survey (USGS) in 7.5-minute, 15-minute, 30-minute, and 1-degree units. The scale of the DEM governs the resolution and the area covered. The minutes and degrees are angular units, where a circle (for instance around the equator) is divided into 360 degrees. Each degree contains 60 minutes, and each minute contains 60 seconds. At the equator, one minute translates to 1 nautical mile or 1.15 statute mile or 1.85 kilometer. Thus, a 7.5 minute DEM covers a square area measuring 8.625 miles on a side, while the 1 degree DEM is 69 miles on a side. Note that these numbers only apply at the equator, and the size represented by the DEM will decrease as you move to the north or south pole. DEM files are also classified by their relative scale. For example, the 1:250K DEM is actually a 1 degree DEM, and a 1:24K DEM is a 7.5 minute DEM. See the Related Links section at the end of this tutorial for more information on DEM files.
Where to Get DEMs
DEM files are made available by the USGS from a number of different sites on the Internet, some of which are listed in the Related DEM Links section at the end of this tutorial. As an example, the DEMs for the Grand Canyon which we will be using here were obtained from the site DEM FIles From EROS. When you are on that site, click on the tab saying "1:250K DEM", then click on "FTP via Alphabetical List". Click on "G" in the Index page that opens. From there, select the two files for the east and west halves of the Grand Canyon, called grand_canyon-e.gz and grand_canyon-w.gz and save them to your hard drive. These files must be unzipped to extract the DEM file before importing them into Carrara. You will also need to right click on the file and rename it to add the .dem extension. For example, after renaming the file for the east half, the filename will be grand_canyone-e.dem. Later on, we will discuss a program called 3Dem that can import one or more compressed files and export the unzipped file with the proper extension, ready for import into Carrara.
If you don't happen to already know the name of the DEM file you want, then click on "FTP via Graphics" from the "1:250K DEM" page to bring up an interactive map which will let you zero in on the area of interest. Be sure to select the compressed file, since the uncompressed files are quite large.
Importing the DEM with the Carrara 4 Terrain Editor GC Importer
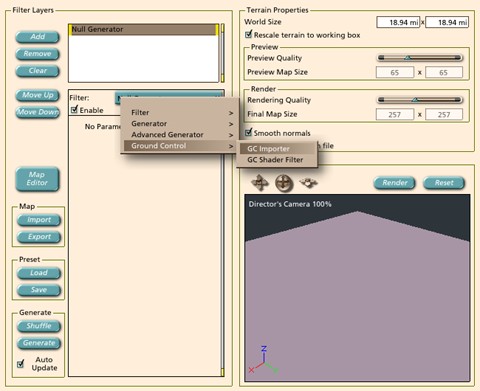
The Ground Control plug-in offers several different methods for importing DEM files into Carrara. If you are using Carrara 4, then the best method is to use the GC Importer found in the Terrain Editor as shown below.
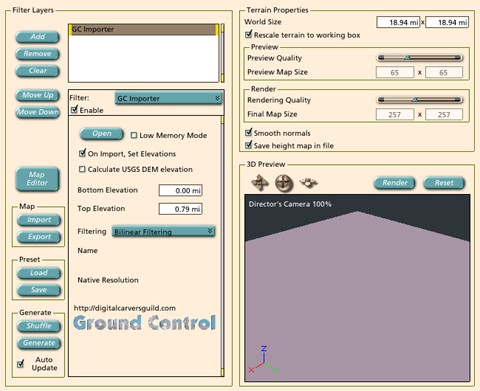
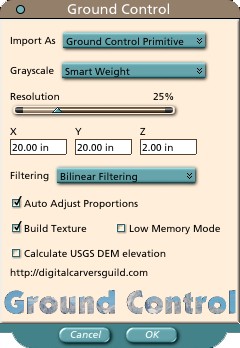
Once the GC Importer is selected, click the Open button to bring up the browser to find and select your DEM file. A new option has been added to Ground Control to calculate the actual DEM elevation. In most cases this option may remain unchecked to speed things up, but in situations where the baseline elevation information in the DEM has been altered by other programs, this option can be a real life saver.
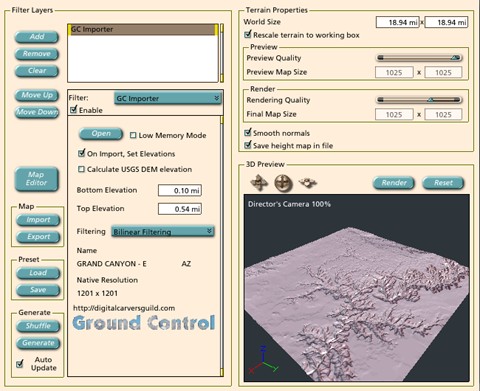
The image below shows the DEM for the eastern portion of the Grand Canyon as it appears in the Terrain Editor.
Importing the DEM with the Carrara 3 GC Importer
If you are still running Carrara 3, then the DEM files are opened by clicking Import under the File menu in the Assembly room, then selecting the desired file with the browser. The popup box for this importing method is shown below.
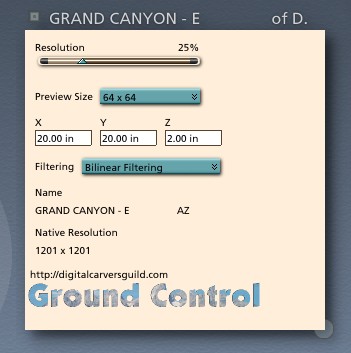
Once the DEM has been imported into the Assembly room, the resolution and other options may be adjusted by selecting the DEM object and entering the Modeling room as shown below.
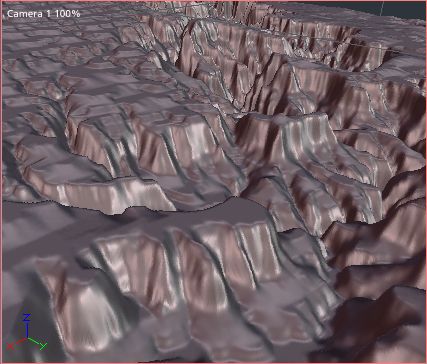
The image below shows the DEM for the eastern portion of the Grand Canyon as it appears in the Assembly room.
Texturing the Terrain
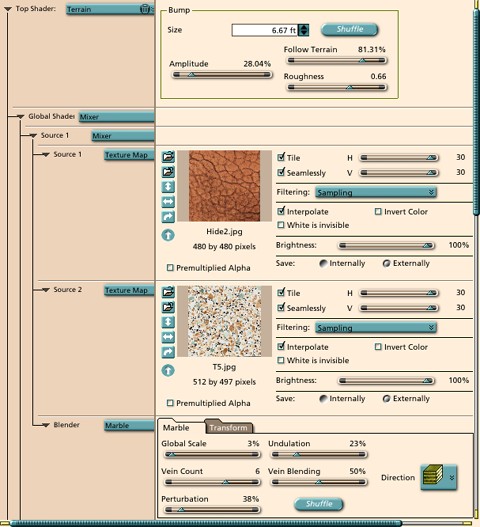
The texture was done using the terrain shader with image maps replacing the colors in the different layers. The faint horizontal bands of the eroded sedimentary rock were created in the Global shader portion of the Terrain shader. A mixer was used to blend two different image files under the control of a marble procedural texture as shown below.
Using Multiple DEM Files
If the area you are modeling is very large, or if it happens to be on the border of adjacent DEM files, then you will need to model it using multiple DEMs. The simplest way to get multiple DEM into Carrara is to import them one at a time using the Ground Control plug-in. This will result in a having a separate terrain object for each DEM. These individual terrain objects are then manually positioned in the Assembly to form the composite terrain.
Another way to do this is to use a standalone program called 3Dem to import all of the DEM files that cover the desired area. The program then exports the combined data as a single DEM file. To import the files into 3Dem, click File, then Load Terrain Model, select USGS DEM, and click OK. A browser will open allowing you to select one or more DEM files to open. To export the composite file, click File, then Save USGS ASCII DEM. A nice bonus is that the 3Dem program will import the original compressed files, saving you the trouble (and disk space) of uncompressing them yourself. The 3Dem program may be downloaded for free from the Related Software Links section at the end of this tutorial.
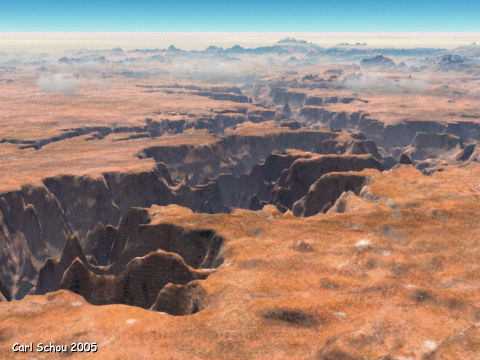
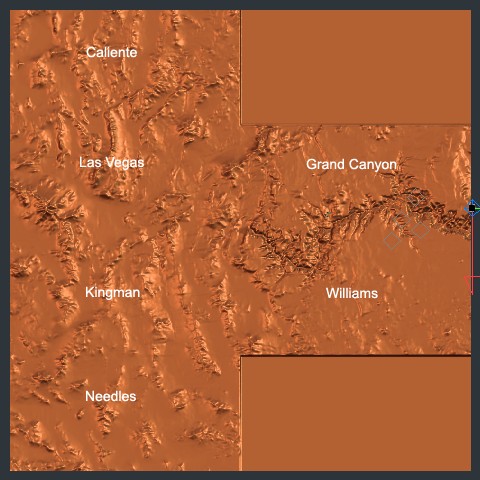
The image at the top of this tutorial, Grand Canyon Overview, was made using the second method mentioned above. Twelve DEM files from the Grand Canyon area were composited in 3Dem, then imported into Carrara via the Ground Control plug-in. During the importing process, the box to "calculate the USGS DEM elevation" was checked on the Ground Control interface to work around an error introduced into the composite DEM file by the 3Dem program. This error is in the minimum and maximum elevation values which are written into the DEM file and used for vertical scaling. Ground Control is able to read through the file and determine on its own the elevation range needed for accurate vertical scaling.
In the screenshot below, the names of the regions are overlaid on the terrain to show which DEM files were used to build the composite. Each named region is composed of an east and a west section, making a total of 12 DEM files. The blank areas were left that way since they are outside the camera's field of view. The camera may be seen on the far right edge of the screenshot.
Scaling the Scene
The easiest way to determine the exact scale of a DEM file is to measure the distance across the terrain using a program such as 3Dem. In 3Dem's overhead view of the terrain, you will see the outline of box that is about one sixth the size of the terrain. Click and drag on a corner of that box until the box fits right across the terrain, then click on Color Scale>Show Scale>Feet (or meters) to open a pop-up window with the terrain's width listed as the scene width. Performing this check with the DEM for the eastern half of the Grand Canyon shows that the DEM represents a square area 55.56 miles on a side.
The composite terrain shown above is four DEM maps in width. Since each 1:250K DEM represents an area measuring 55.56 miles across, the width of the composite terrain is about 222 miles. In the Assembly room, the composite terrain measured 300 by 300 Carrara units. Dividing 222 by 300 tells us that the relative scale in this scene is 0.74 mile per Carrara unit.
Other Resolutions and Formats
The scene created in this tutorial was built using DEM files at a 1:250K scale. Because these files represent such a large area, they are limited in the amount of detail they can contain. If you want to create a scene closer to the ground with more surface detail, you'll want to use the 7.5 minute DEM files in the SDTS format. These files may be imported into the 3Dem program, then exported in the DEM format so that Ground Control can bring them into Carrara. The SDTS files are available in 10 meter and 30 meter resolution, and they may be obtained by clicking on the "1:24K DEM" button on the EROS site.
The Rest of the Picture
The image at the top of this tutorial, Grand Canyon Overview, shows the view looking west across the Grand Canyon. The camera was positioned at a height of 8.8 Carrara units above the terrain. This translates to a viewpoint with a relative altitude of approximately 6.5 miles above the surface. The Realistic Sky model was used, with a single layer of Cirrus clouds, and the appropriate numbers in the boxes that scale the sky to the scene. A few small volume clouds were added to the middle distance, and rendering was done at Full Raytracing, Anti-Aliasing set to Good, with 0.5 pixel Object Accuracy, and 1 pixel Shadow Accuracy.
Special Thanks
Special thanks go to Eric Winemiller of the Digital Carvers Guild, and to Aabh and DigReal at the Cybernetic Bumper Breath 3D Forum.
Related Software Links
Eovia, home of Carrara Studio 4
Digital Carvers Guild, home of Ground Control
3Dem Software for DEM Visualization
Related DEM Links
Geo-Community USGS DEM Resources and Index
Copyright (c) 2005, Carl E Schou, All Rights Reserved