| Carrara Studio 3
Tutorial: Infinite Motion
Loops
Carl E. Schou
March 31, 2004
| |
|
Emergence
The animated image shown above is a one
second repeating loop that was produced in Carrara Studio 3. The purpose of this tutorial
is to cover one technique for creating near seamless looped
animations in Carrara. We will start the tutorial by looking
at the particular strategy to be used, before we start in with the
actual animation work. |
| |
|
Walk Before You Run - Starting
Simple
The approach we are going to take will be to build a simple
looped animation using spheres to get the scene set up. Once
this works satisfactorily, the spheres will be replaced with more
complex and interesting models. The benefit of this approach
is that it is very quick and easy to set up an animated scene with
basic primitives. Trying to do the initial set up of the
animation with a large number of complex models can add a lot of
extra work when you have to backtrack, and it can slow down the
system in some extreme cases. |
| |
|
Strategy for
Perpetual Motion Loop
(1) Determine the time duration of the loop
segment.
(2) Determine how far your model will move
during a single loop segment.
(3) Determine how far your model will move
during a single frame. This is called FrameDistance.
(4) Create a clone of your model with a
starting position set one FrameDistance beyond the ending position
of your original model. The clone will move the same distance
as the original, and it will travel in the same direction.
When the animation repeats, the clone will appear to continue from
the ending position of the original model.
(5) Group the original and the cloned model
together.
(6) Replicate the groups as many times as
desired, at various positions.
(7) If you did your setup using simplified
models, replace them with the actual models to produce the final
version of the scene file.
(8) Render the final animation. |
| |
|
Start With a Single
Simple Sphere
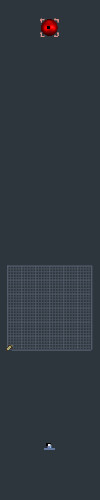
To begin, we will set up a scene in
Carrara's Assembly room using a single sphere. The result will
be a one second animation running at 24 frames per second. Looking at the
top view of frame 1 (shown below), the sphere's starting position is
a large distance from the camera, which can be seen at the bottom of
the screenshot. In frame 24, the sphere has been moved closer
to the camera. The animations show the sphere moving from the
top view and the camera's view. |
| |
|
|
Frame 1
Top View
|
Frame 24
Top View
|
Frame 1 to 24
Top View
|
Frame 1 to 24
Front View
|
| |
|
|
|
|
|
|
| |
|
|
 |
 |
 |
 |
| |
|
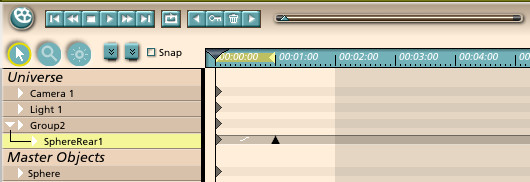
The Sequencer tray
for the single sphere scene is shown below. To produce the
animation, the time scrubber was set to 1 second (frame 24) and the
position of the sphere was changed in the Properties tray.
This produced the Keyframe indicated by the arrow in the timeline
for the object SphereRear1. |
| |
|
Add a Second Sphere
to Continue the Motion
By stepping through the animation and
monitoring the position of the sphere in the Properties tray, it was
easy to determine how far the sphere moved from one frame to the
next. This distance was added to the end position of the
sphere to determine the start position of a second sphere.
This clone was set to travel the same distance and direction as the
original sphere. To make things easier to handle, the original
and the cloned sphere will be grouped together.
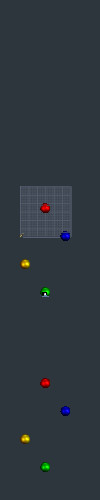
Shown below in frame 1, you can see the
start positions of the original sphere (labeled 1) and the cloned
sphere (labeled 2).
In frame 24, the original sphere 1 has moved
to its end position, which is FrameDistance less than the start
position of sphere 2. The end position of sphere 2 is not
visible since it has moved out beyond the position of the camera.
In the animations, it can be seen that
sphere 2 picks up where sphere 1 leaves off when the loop repeats.
The beginning of the loop is still very evident because of the
sudden reappearance of sphere 1 at its start position. |
| |
|
|
Frame 1
Top View
|
Frame 24
Top View
|
Frame 1 to 24
Top View
|
Frame 1 to 24
Front View
|
| |
|
|
|
|
|
|
| |
|
|
 |
 |
 |
 |
| |
|
Replicate the Moving
Pairs of Spheres and Create a Fade-In
Next, the first group was replicated three
times and arranged in a circle around the camera, at different
distances from it.
In the animations, the effects of two
different types of fade-ins are compared against the abrupt startup
produced with no fade-in. For the Fog fade-in, Distance fog
was added to the scene to obscure the distance at which the spheres
suddenly appear at the start of the loop.
For the Size fade-in, the more distant
original sphere of each group started the loop with its size set to
1%, and it finished the loop with the size set to 100%. The
size of the second cloned sphere in each group was not changed. |
| |
|
|
Frame 1
Top View
|
Frame 24
Top View
|
Frame 1 to 24
Front View, No Fade-In
|
| |
|
|
|
|
|
| |
|
|
 |
 |
|
| |
|
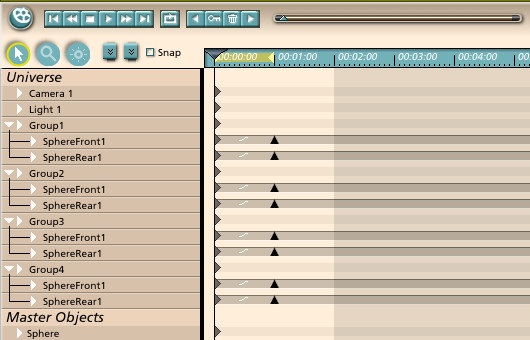
The Sequencer tray
for the quad sphere scene is shown below. The four groups are
open to show the original sphere in the rear and the cloned sphere
in the front. Also note that each object has its own keyframe
at the end of the one second loop. |
| |
|
Replace the Spheres With Complex
Models
Once you are satisfied with the behavior of your looped test
animation, you can replace the spheres with more complex models to
produce the final animation. For this particular project, the
start and end positions of each group were recorded. A new
scene file was created with two models grouped together in the same
relative start and end positions as the spheres from the first
group. This group was then replicated, and each new group was
given the proper start and end positions to mimic the sequence which
had been created with the simple sphere model. |
| |
|
The Rest of the
Picture
The animation at the top of this tutorial,
"Emergence",
was made by extending out the procedures we followed here. A
simplified version of the animation was made using seven grouped
pairs of spheres, arranged in a circle, with each group starting at
a different distance from the camera. When the animation
worked correctly, the spheres were replaced with the spacecraft
models which had been built in Amapi. The animation was
rendered as a sequence of Photoshop PSD files with alpha channels so
the background of each frame could be made transparent in Photoshop.
The files were then made into an animated GIF using Image Ready.
The backdrop of the galaxy and starfield was made using the StarBits
program. |
[RETURN TO TUTORIALS]
Copyright © 2004,
Carl E Schou, All Rights Reserved |