The Fountains of Carrara
Carl E Schou
December 31, 2002
|
|
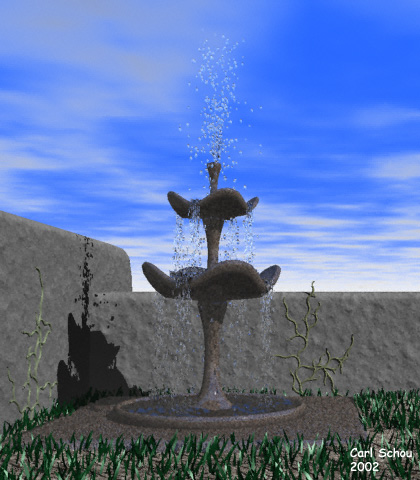
The Fountain
in the Garden
Ever wanted a fountain in your back
yard but did not want to fool with the maintenance? Well,
for this month's foray into the digital domain, we are going to
build a three-tier fountain in Carrara Studio 2 so you won't have to dig up
any flower beds. |
|
|
Overall Strategy
Before we start building our scene in
Carrara, we are going to take a look at what Particle Emitters are
and how they work. Then we will start up Carrara and build a
simple three tier fountain for our project. We will create
the water in each basin by using terrains. Next we will add
particle emitters to simulate the moving water and tune them for the effect we want.
Once we are satisfied with our model, we will set up
the Sky and camera settings for our scene and add the assorted props needed to complete the picture. |
|
|
Particle
Emitter Background
Particle Emitters are used
to generate effects like explosions and fountains by generating
small simple objects that follow the laws of physics over time.
If you examine the individual frames of an animation, you can see
how each particle follows its own trajectory. The user has control over parameters such as gravity, air
resistance, particle spawning, duration, and bounce. Because particle
emitters work over time, they need to be run from within an
animation package, such as Carrara Studio 2. |
|
|
Steps in Building the
Fountain
To build the fountain, we
are going to start by building a simple square base. Next, we
are going to use the Vertex modeler's Draw tool to produce half the
outline of the top level of the fountain. We will Lathe the
outline to produce the actual 3D master object. This top level
will be duplicated twice to produce the middle and bottom
levels. The bottom level will be made its own master object so
it is not affected by changes to the other two levels. The top
level's bowl edge will be molded to give the water some clearly
defined spill points. These changes will be automatically
transferred to the middle level since the top level is the master
object of the middle level. Finally the parts will be put into position in the Assemble room
and grouped using the Sequencer tray. |
|
|
Building the
Fountain
In the Carrara Assembly
room, drag the Vertex Object icon into the 3D View to insert a
Vertex object. This will put you into the Vertex modeling
room. Click on Insert>Block and set X and Y to 30 and Z to 1.
To prevent any hard edges, the top surface of the base was beveled
by extruding it 0.2 in the Z direction and reducing the size of the
extrusion by 95% in the X and Y directions. Return to the Assembly room, open the Properties tray at the right
side of the screen, and set the X and Y position to 0 and
the Z position to 0.5. Change the object's name to
"Base".
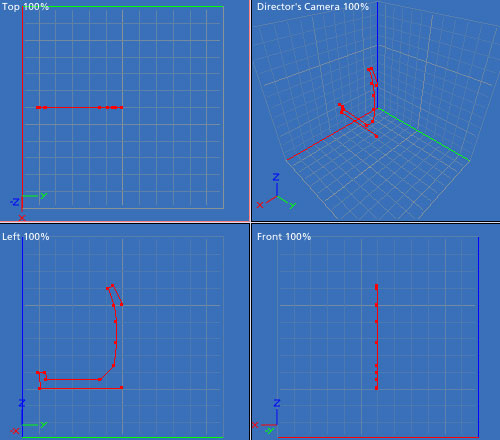
Drag another Vertex object
into the 3D View and return to the modeling room. Select the
Polyline tool and build the outline shown in
the Left View Window below. Make sure the end points of the
outline are resting on the Z axis so that Y = 0.
|
|
|
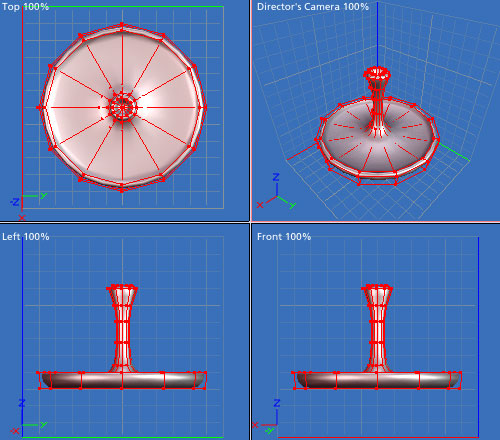
Next we Lathe
the outline to produce the 3D object. Make sure all of the
points are selected and press Construct>Lathe and press
Enter. Select everything and turn on Subdivision Surfaces in
the Properties tray at the right side of the screen. Your
view should look similar to the image below. Return to the
Assembly room and use the Properties tray to change the name of
this part to TopLevel. Set the X and Y position to 0 and
the Z position to 24. |
|
|
Duplicate the
top level by selecting it and pressing CTRL+D. Using the
Properties tray at the right side of the screen, increase the
Overall Size of the new part to 150% and change the name to
MiddleLevel. Set the X and Y position to 0 and
the Z position to 17. Press CTRL+D again to create the BottomLevel
and set the Overall Size to 200%. Set the X and Y position to 0 and
the Z position to 7. The simplest way to make
the BottomLevel a new master object is to double click on it to
edit it. In the window that opens, click the button that
says "Create a new master". Return to the Assembly
room. |
|
|
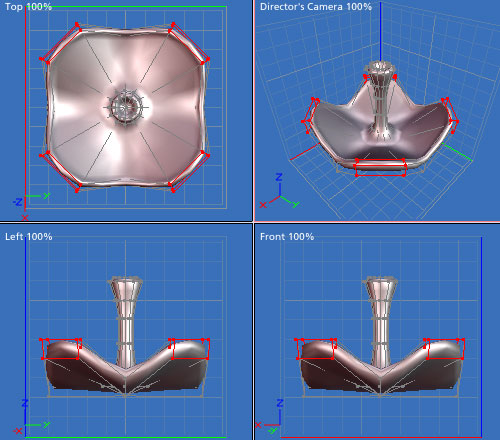
Now we are
going to mold the edge of the bowls for the top and middle levels.
Double click the TopLevel object to edit it in the Modeling
room. Select the points at the outside of the rim at the 12,
3, 6, and 9 o'clock positions in the Top view. You should
have a total of 16 points selected. Resize these points to
80% in the X and Y directions to make the top view more square.
Next select the other points along
the rim as shown in the Top view below. Move these points up
2 units in the Z direction. Return to the Assembly room and
you'll see the same changes have been automatically made to the
MiddleLevel object.
|
|
|
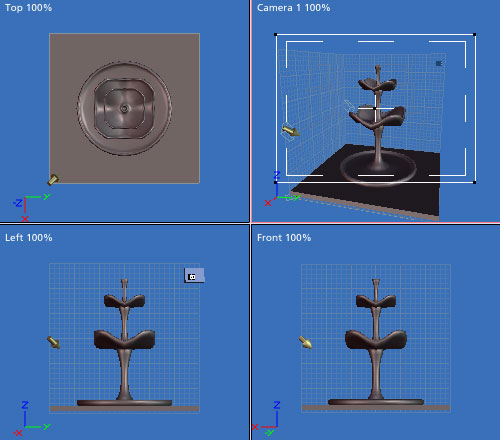
When you're
through, the fountain should like something like the image below.
Just apply some granite shaders for texturing, and you'll be ready
to add the water. |
|
|
Adding the
Water
Now we are going to build the water
that fills each bowl. We could just use a simple disk with a
water texture applied and size it to fit the different levels, but
real water isn't flat, especially in a running fountain. We are going to build the water using
a terrain. We will export the terrain's grayscale height map
and adjust it a bit in Photoshop, then import it back into Carrara
to produce the water disk. If you don't have Photoshop or
another image editor, you can do this step in Carrara, and we will
cover that as well.
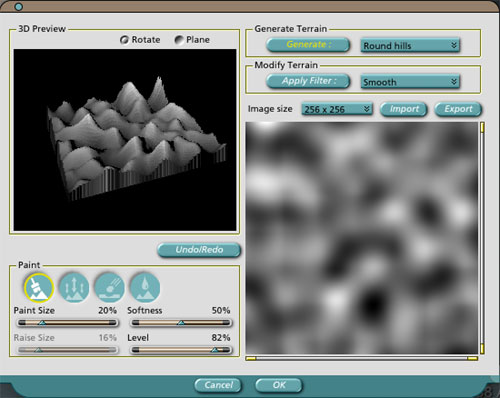
In the Assembly room, drag a Terrain
object into the 3D view, then go into the modeling room.
Click the Edit button and generate a Rounded Hills terrain from
the presets as shown below. |
|
|
Export the
image from the terrain editor and import it into Photoshop.
Decrease the contrast. Apply the Ocean Ripple filter to get
a water effect. Select a circle in the middle of the image,
invert the selection, and fill the selection with black.
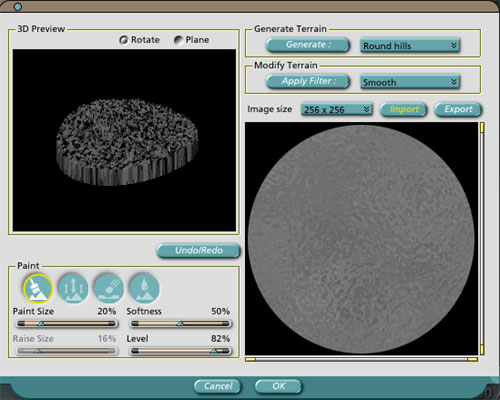
Export the image from Photoshop. Back in Carrara, import the
new image into the Terrain Editor and generate the terrain.
You should see something like the image below.
Click on
Edit>ConvertToOtherModeler and select Vertex modeler. In
the Side view, select the bottom few edges and delete them.
You should be left with a thick round disk.
If you don't have Photoshop or
another image editor, you can do this step in Carrara by Boolean
intersecting a cylinder with the terrain, then cutting the size in
the Z direction down to about 20%. |
|
|
Return to the
Assembly room. rename the object to BottomWater, and set the X and
Y position to 0 and the Z position to 1.9. Open the Browser
tray at the left side of the screen, select Shaders, and drag the
Water shader onto the BottomWater object. Duplicate this
object twice, rename the duplicates to MiddleWater and TopWater,
place them in their respective bowls and adjust their size to fit. |
|
|
Turning
on the Fountain
We could stop the modeling process
here but, without moving water, all we would have for our efforts
would be a three story birdbath. We will produce the top
level spray of water with a master particle emitter. Another
master particle emitter and three duplicates will produce the
water spilling from the TopLevel object to the MiddleLevel.
The same arrangement will be used to produce the water spilling
from the MiddleLevel to the BottomLevel. |
|
|
Building the
Top Level Spray
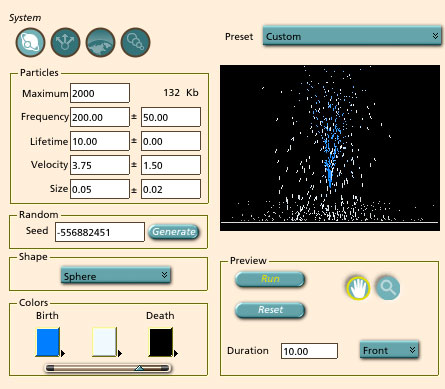
From the Assembly room, drag a
Particle Emitter object into the 3D view and go into the modeling
room. Start with a Fountain preset and adjust the system
settings as shown in the image below. |
|
|
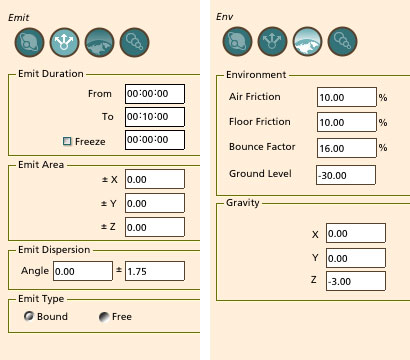
For the Emit
and Environment settings, use the values shown below. |
|
|
In the
Assembly room, rename this object as TopLevelFountain, set the Z
size and the Overall size to 200% and set the Z position to
13.0. This should place the emitter in the little opening at
the top of the TopLevel object, though you will probably have
tweak the settings to account for your individual model.
Apply a water shader to this object. |
|
|
Spill from
the Top to the Middle Level
With the TopLevelFountain still
selected, press CTRL+D to duplicate it, then rename the duplicate
as TopLevelSpill_1 and edit it as a new master. Under
System, change size to 0.25 + or - 0.05. Under Emit, change
the Emit Areas to 1.50 for X and 4.00 for Y. Change the Emit
Dispersion angle to 75 degrees. Under Environment, change
the Ground Level to -7.00.
Back in the Assembly room, apply a
water shader, set the X and Y size to 10%. Set the Z size
and the Overall size to 100%. Set the position to X = 4.00,
Y = 0.00, and Z = 19.3. It should be sitting in one of the
four spill points from the top level, but again the position may
need tweaking. Duplicate it three times, naming the
duplicates as TopLevelSpill_2, _3, and _4. Position
TopLevelSpill_2 at X = 0.00, Y = 4.00, and Z = 19.3, tweak it to
fit your model, and set the Yaw to 90 degrees. Similarly,
set TopLevelSpill_3 to X = 0.00, Y = -4.00, Z = 19.3, and Yaw =
90. Finally set MiddleLevelSpill_4 to X = -4.00, Y = 0.00, Z
= 19.3, and Yaw = 0. |
|
|
Spill from
the Middle to the Bottom Level
Select TopLevelSpill_1, press CTRL+D
to duplicate it, then rename the duplicate as MiddleLevelSpill_1
and edit it as a new master. Under Emit, change the Emit
Areas to 3.00 for X and 8.00 for Y. Under Environment,
change to Ground Level to -12.00.
Back in the Assembly room, set the
position to X = 6.00, y = 0.00, and Z = 9.2. Once you have
MiddleLevelSpill_1 in position, duplicate it three times, naming
the duplicates as MiddleLevelSpill_2, _3, and _4. Position
MiddleLevelSpill_2 at X = 0.00, Y = 6.00, and Z = 9.2, and set the
Yaw to 90 degrees. Similarly, set MiddleLevelSpill_3 to X =
0.00, Y = -6.00, Z = 9.2, and Yaw = 90. Finally set
MiddleLevelSpill_4 to X = -6.00, Y = 0.00, Z = 9.2, and Yaw = 0. |
|
|
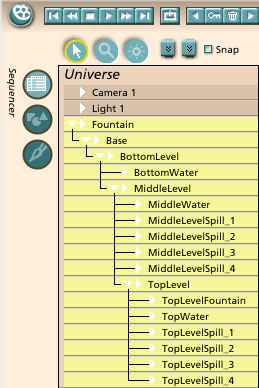
Setting up
the Hierarchy
To keep our model organized and to hold it together when we
move it around in a scene, we are going to group it in the Hierarchy section of the
Sequencer Tray. To do this, simply click and drag each child
part onto its associated parent part. For example, the
BottomLevel is the child of the base, but it is also the parent of
the MiddleLevel. The hierarchy used for the Fountain is
shown below. |
|
|
The Rest of
the Picture
The sky in the image at
the top of this tutorial was adjusted using Carrara's Atmosphere
editor. Two intersecting walls were added to the scene by
using blocks that were beveled the same way as the base. The
vines on the walls were generated in PlantStudio from Kurtz-Fernhout
Software. The grass was generated with a program called Grass
from Bantam3D. Links for both of these free programs are given
below. |
|
|
Wrapping Up
Well, that's it for this time.
I hope everyone has a safe and happy holiday. |
[RETURN TO TUTORIALS]
Copyright © 2002,
Carl E Schou, All Rights Reserved |