Modeling a Dinosaur in
Organica
Carl E Schou
October 31, 2001
|
|
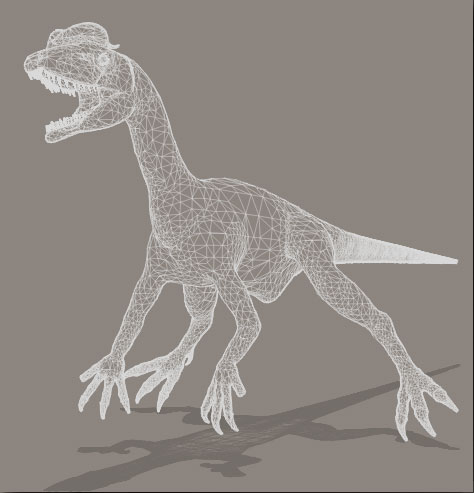
For this month’s foray
into the 3D domain, we’re going to model a dinosaur: a
Dilophosaurus, to be exact. The techniques covered here can be
applied to a wide variety of creatures, still living or extinct,
as well as all sorts of other objects. The model produced will be used as the basis for future tutorials on painting and
posing. The bulk of the modeling work was done in Organica,
with a little help from Amorphium, Decimator, and UVMapper. The components were assembled into a single model in
Poser, and the finished wireframe model is shown above.
|
|
|
Dilopho – Who?
The first fossilized Dilophosaurus remains were found in the
Navaho Nation in Arizona, in 1940, by a man named Jesse
Williams. The investigating paleontologist, Sam Welles from the
University of California Museum of Paleontology, realized he was
looking at something new. A few more specimens were found and some
facts came to light.
Dilophosaurus lived about 180 million years ago, in the early
Jurassic. This was about 115 million years before the time of
Tyrannosaurus Rex. Dilophosaurus was the biggest predator of its day, about 20
feet long and 1000 pounds in weight. It belonged to an early class
of dinosaurs, the ceratosaurs. Like other ceratosaurs, it had a
clawless vestigial fourth outer finger on each hand and a cleft in its
upper jaw. Unique to Dilophosaurus were the two crests adorning
the top of its head. You can find more information and some
illustrations by clicking on the links at the end of this
tutorial.
Dilophosaurus achieved some fame as the frilled, poisonous
"spitter" in the first Jurassic Park movie. However, the
real animal was much larger. There is no evidence it was
poisonous. Being so big, it wouldn’t have needed to be.
There is
also no evidence for the existence of any kind of a neck frill,
which would have shown up in the structure of the neck vertebrae.
Personally, I prefer the real beast anyway.
|
|
|
Modeling Requirements
Before beginning the modeling process, it’s a good idea to
examine all of the tools you’ll be using to determine the best
strategy. The model will be built in Organica, a package that
works with Metashapes. The nice thing about Metashapes is that you
can generate complex organic forms when the Metashapes glom
together. The down side is that body parts you’d want to keep
separate (like fingers) will glom together unless they’re kept
spread apart. Another caveat is that, when you generate a mesh
with a lot of detail in some areas like teeth, you’re can wind
up with a humongous polygon count.
After construction, this model is going to have texture mapping
added in Deep Paint 3D. If this is done while all of the moving
parts of the model are in their middle, neutral positions, there
will be fewer texture map problems to fix later on.
The model will also have a skeleton added in Poser Pro Pack.
For best results, the limbs should be aligned with one of the
coordinate axes to keep the rotation orders of the bones from
getting too confusing. This is the reason that a lot of Poser
models are initially set up in a position that looks like they’re
getting ready to do calisthenics for gym class.
|
|
|
Modeling Strategy
- Construct model in Organica with the arms and tail in the
neutral position, fingers spread and legs spread to minimize
unwanted glomming of the mesh. Eyes will be added later.
- Export body from Organica as a medium-density mesh DXF file.
- Export teeth from Organica as a high-density mesh DXF file.
- Import body mesh into Amorphium to correct normals.
Export
as OBJ.
- Import teeth mesh into Amorphium and correct normals.
Export
as OBJ.
- Cut body mesh down to size using stand-alone Decimator
program. You can also use the Optimize function in ZBrush.
Export
as OBJ.
- Import body mesh into Amorphium for normal correction, as
well as smoothing and touch-up. Export as OBJ.
- Import body and teeth into Poser.
Add eyes using ball props.
Adjust relative sizes and positions of parts. Assign
hierarchies and create figure. Export as OBJ.
- Apply UV coordinates to finished OBJ
file using UVMapper. This completes the modeling portion
of this project.
Note: If you don’t have Amorphium, then Zbrush or 3D Explorer or
Crossroads (free!) can do the file conversions and Zbrush can do
the touch up work.
|
|
|
Painting and
Posing Strategy
Painting the
model will be covered in the coming tutorial, "Painting a
Dinosaur in Deep Paint 3D". VAMP mapping will be used to
allow distortion-free projection painting.
Posing the
model will be covered in the coming tutorial, "Posing a
Dinosaur in Poser Pro Pack". A temporary skeleton will
be used to bring the limbs into the proper orientation for
posing. A permanent skeleton will then be built for the
model.
|
|
|
Model in Organica
We are going to model all the parts of our Dilophosaurus,
except for the eyes, using the basic Metashapes in Organica.
You’ll
want to read through this section and have a good overview of what
you’re going to do before you start Organica. You can do all of
your work in a single file by refining it as you go, but with this
many parts, I’d recommend saving each section into its own OGC
file. This will speed things up when you want to see the given
part’s mesh. When you have all the sections roughed out and
saved, combine them into a total model by opening Organica and
importing each section, adjusting that section’s size and
position as you go. When you’ve got it all together, save your
total model and see what parts still need work. Select the section
that needs work and export it to a new file, then
delete that section from the total model and save the total model
as a new version. After you’ve modified
and saved the section that needed work, open the new version of
the total model and
import the changed section and see how it all fits. This modular
modeling approach adds some extra planning to your work, but it
can save your sanity if you need to restore one part of a model to
an earlier version but don't want to lose all the work you've done
on the other parts.
We’ll also take advantage of the mirroring capabilities of
Organica to cut down the modeling work of any symmetrical parts
like arms, legs, and parts of the head. To do this, make sure that the head,
body, and tail are centered down the Y-axis where X equals zero. Select the part to be
mirrored, click the mirror button and mirror the part around the
X-axis. Press enter to pull up the properties window, select the
position tab, and change the sign of the position value in X.
Presto, your part is mirrored.
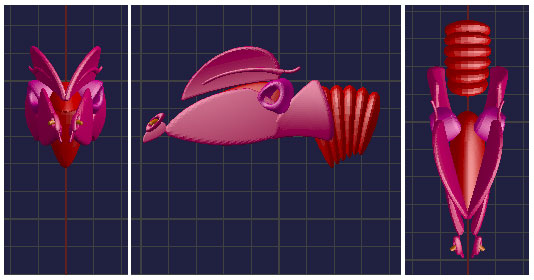
The composite images below
show the construction of the head. They also include the first six segments of the neck, which is
covered later. The colors are the defaults for the various
Metashapes. The first three images are the front, side, and top views of the head halfway
through construction. The Eye sockets and nostrils were
built with Tube Metashapes. The sides of the head and the
crests were built with Disk Slices. Subtractive Cylinders
were inserted into the nostrils to keep them from getting glommed
over by the mesh. The internal roof of the mouth was built
using a Bowl.
|
|
|
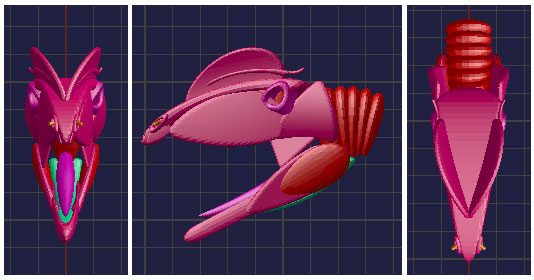
The three images
below are the same
views of the head with everything but the teeth. The tongue
was built with the Football Metashape. The floor of the
mouth was built using a Pie Slice. The muscles at the hinge
of the jaw used Spheres. The sides of the jaw and the top of
the head were built
using Disk Slices. The U-shaped tip of the jaw was built from
a Bent Cylinder. |
|
|
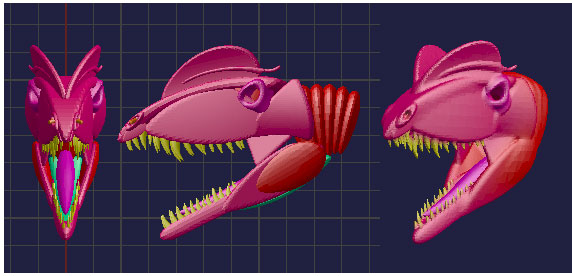
The teeth were
added to the three images below. The top view at the right has been replaced with a quarter
view of the mesh. The teeth were made from cones with the roundness reduced and bent
in the Z-X plane. |
|
|
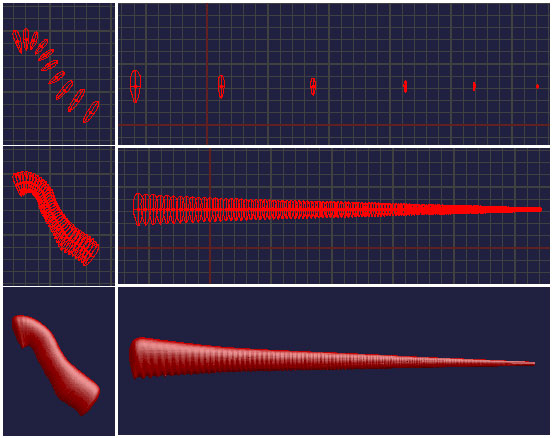
The composite image below
shows the construction of the neck on the left and the tail on the
right. Both of these body parts were produced by cloning a
few sample Metashapes. The upper left image shows the pieces of the neck before
cloning. The middle left shows the neck after cloning, and the
bottom left shows the mesh. The three pictures on the right show
the same sequence for the tail. The pieces making up the neck and
tail were squashed Spheres, tapered at the bottom ends to produce
the desired cross-sectional shape. It's worth noting that
cloning works best when done in steps. Select the first few
pieces and clone, select the next few pieces and clone, repeat as
needed. |
|
|
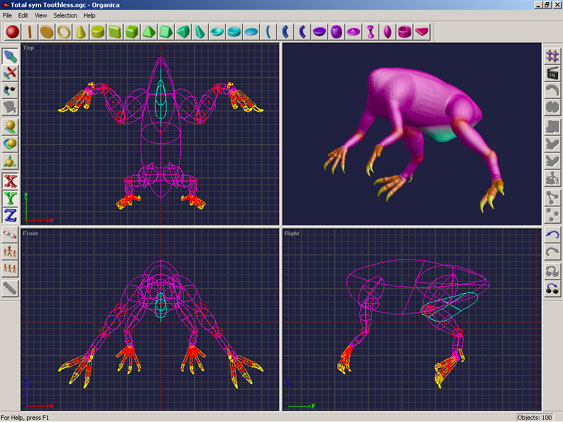
The image below shows a
screen shot of the finished body and limbs. The top, front, and
side views are in wireframe mode, with the mesh shown in the upper
right window. The body and limb sections were built with deformed
football shapes. The fingers and toes are cylinders with small
spheres added for the joints. The claws were built the same way as
the teeth. It should be noted that the hind legs are spread
out for modeling purposes only. They will be rotated along
the Z-axis to give them a vertical orientation later using Poser
Pro Pack. |
|
|
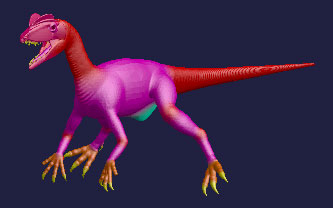
Putting all the pieces
together should result in something like the image shown below.
It may take several passes to get the model to this point. |
|
|
Now we're
going to generate one mesh file for the teeth and another mesh for
everything but the teeth. Select the teeth and export them to a new file called
Teeth.ogc by
clicking File>Export. Delete the selected teeth and save the remainder of the model as
Skin.ogc. Start by setting the Mesh as follows (size = 2,
face reduction = 1.0, precision = 10).
Press Apply on the mesh drop down menu and it will start
building the mesh. Experiment with these settings until you find a
good compromise between mesh quality and polygon (face) count.
When you’re satisfied, save the mesh as a DXF file called
Skin.dxf by selecting File>Save Mesh Object>DXF Format.
To get the mesh of the teeth, clear the work area and open
Teeth.ogc. Set the Mesh for a finer grade as follows (size =
0.75, face reduction = 1.0, precision = 10). Experiment until you’re satisfied with the mesh
quality and polygon count. Save the mesh as a DXF file
called Teeth.dxf.
|
|
|
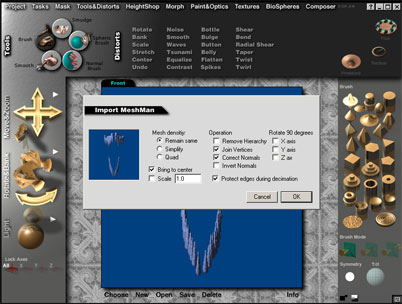
Fix Normals in Amorphium
Once we have the two main DXF files, we’re going to bring
them into Amorphium to correct the normals and to convert the
files to the Wavefront OBJ format. After starting up Amorphium,
import the Skin.dxf file by clicking Projects>Import and
selecting your DXF file. When the Mesh Man (stands for Mesh
Manipulation) window opens up, add a check mark to "Correct
Normals". Once the import process is complete, export the
file as an OBJ file called Skin.obj. Repeat this process with
Teeth.dxf to produce Teeth.obj. This is illustrated in the
screen shot below.
|
|
|
Cut it Down to Size in Decimator
or ZBrush
The Skin.obj file probably has a lot
more polygons than you really need. You can cut the model
down to size using a standalone program like Decimator, or the
optimize function in ZBrush. Either program allows you to
drastically reduce polygon count in selected areas or over the
whole model. The main places you need high density
mesh are around the flexing areas like joints and the detail areas
like claws. Whatever you do with polygon reduction, I'd
recommend that you save the reduced file with a new name so you
can backtrack, and that you test out the reduction by looking at a
smoothed rendering. When you’re satisfied
with the compromise between mesh density and
quality, save the file as SkinReduced.obj.
|
|
|
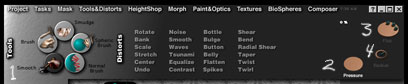
Remove Ugly Cellulite in Amorphium
Now we’re going to bring the reduced mesh of the skin into
Amorphium to reduce the ribbing effect produced by glomming
together a series of Metashapes. Import the SkinReduced.obj into
Amorphium and correct the normals. Select a point of view where an
area that needs smoothing is facing you. Select the Smooth
Brush (at 1 in the screen shot below),
set the pressure to zero (at 2), turn down the flux (at 3), and set the radius
(at 4) to just cover the
area you want to smooth. Now click and drag to smooth out
and remove the ugly cellulite. When you’re through, export the file as
SkinReducedSmooth.obj.
|
|
|
Putting it all Together
in Poser
Next, we’re going to assemble the pieces of the model in
Poser. To do this, start up Poser and select Figure>Delete
Figure to clear the Pose Room. Now bring in the skin OBJ file by
clicking File>Import and selecting the file
SkinReducedSmooth.obj. Import the file Teeth.obj the same way.
Add
two Ball Props for the eyes. Use the menu to select each part and
adjust its size and position. Select Window>Hierarchy
Editor and rename the body parts by double clicking on the present
names (ball1 to leye, ball2 to reye, etc.). Make the eyes and
teeth children to the body object by clicking and dragging them
over the body object. Click the Create Hierarchy button,
then close the Hierarchy Editor. Save your work as
Dilophosaurus.pz3. Export it as Dilophosaurus.obj. In
the export dialog, you'll want to check the boxes for "Include body part names in polygon
groups" and "Include existing groups in polygon
groups". The other export settings can be left as they
are.
|
|
|
Wrapping Up
With UV
Mapping
To prepare the model for painting, we need to
apply UV mapping coordinates to our OBJ file using the
program UVMapper by Steve Cox. If you don't already have it,
you can download the beta version of the program using the link at
the end of this tutorial. Start the program and
select File>Load Model>Dilophosaurus.obj. You'll get a report
on items like the number of vertices and facets. Click on
OK, then select Edit>New UV Map>Planar (or other
mapping type). You can adjust the alignment, orientation,
and splits in the map. For my model, I just used Planar
mapping and accepted the defaults since I'm going to texture the
model later on in Deep Paint 3D. After mapping, click on
Edit>Select>All, then click on
Edit>Assign>Material. You will be prompted for a name
for the material and to create the material. Once this is
done, save out the complete UV mapped model as DilophosaurusUV.obj.
|
|
|
Are We There
Yet?
Yep, we're there. That's it for the modeling part
of this project. Next comes the painting and the
posing. After that you'll have a fully textured, posable
model suitable for animation. Of course, there may be a few
bumps along the way, but your best protection is to save your work
as you go and keep track of all the changes you make. That
way, if you get the whole thing put together and it comes out
looking like your dog, you can always backtrack and fix it.
Plus, you'll also have a nice model of your dog.
Until next time, Happy Modeling.
|
[RETURN TO TUTORIALS]
Copyright © 2001,
Carl E Schou, All Rights Reserved |