Posing a Dinosaur in Poser
Pro Pack
Carl E Schou
December 31, 2001
|
|
Jurassic
Jogger
The last two tutorials covered modeling a dinosaur
in Organica and painting it in Deep Paint 3D. This time out,
we're going to import our model into Poser Pro Pack and give it a
skeleton to make it posable. We’ll start by covering the use of Pro Pack for
pre-grouped, un-grouped, and semi-grouped models. Then we'll
go to work to make our dinosaur model posable.
If you are not familiar with the
concepts of grouping and hierarchies, I’d recommend that you
consult the manual on those topics before attempting this tutorial.
The end
result is shown in the above picture, "Jurassic Jogger".
It shows a Dilophosaurus enjoying its morning constitutional in a
grove of cycads, around 180 million years ago. Flowering
plants, grass, and broadleaf trees were still 100 million years in
the future. Conifers, gingkoes, cycads, and tree ferns made up
the bulk of Jurassic plant life.
|
|
|
General Techniques for a
Pre-Grouped Model
The easiest way to make a posable model
is to start with a model that has already been sliced into
groups. Each body part is a separate group with a name
identical to the internal name of the bone it will be assigned
to. The model is imported into the Pose room, then it’s
brought into the Setup room where a pre-existing skeleton is added
or a new skeleton is created from scratch. As long as there
are no naming conflicts between the bones and the groups, the model
is now posable and only needs tweaking to adjust the blend zones,
rotations, positions, and orientations.
|
|
|
General Techniques for
an Un-Grouped Model
If the model has not been divided
into groups, Poser can do that for you. Add the skeleton in
the Setup room as you did above, then use the Auto Group function
in the Grouping Tool to slice the model. You’ll need to
reassign polygons to get the model grouped the way you want it,
but the Auto Group will get you started. Using Auto Group,
the group names will automatically agree with the bones.
|
|
|
General Techniques for
a Semi-Grouped Model
If the main body of the model is
ungrouped but has extra grouped parts, like movable eyes, using
the Auto Group function will wipe out the grouping for those
extras parts. This is where things can get complexicated.
One possible approach is to export the eyes to their own object
files, delete them from the figure, add the skeleton, Auto Group
the figure, and import the eyes back in as props. You can
keep the eyes as props, but it makes the model difficult to work
with. The solution is to Spawn Props on the figure in the
Setup room. Spawning Props duplicates all of the groups in
the figure as props. Delete the original model and export
all of the props to an object file. Clear the Pose room,
import the object file you just created and reinsert its skeleton in
the Setup room. The eyes have been turned into actual parts
of the figure instead of just being props.
|
|
|
Overview of
Posing Strategy
Build or get the model you want to pose.
Import the model into Poser.
Go into the Setup room and build a
skeleton from scratch or open a similar figure in the library to
get its skeleton.
Add bones where needed.
Adjust the size, position, and orientation of the skeleton to fit
the model.
Open the Group Tool and Auto Group the
model.
Manually clean up the groupings and any misassigned polygons.
Open the Joint editor to fix any rotations that need it and
adjust the Blend Zones.
Test the model in the Pose room. Fix any problems and tweak the
bones.
Add the eyes, if they are to be
posable.
Add the finished figure to the library.
|
|
|
Loading the
Model
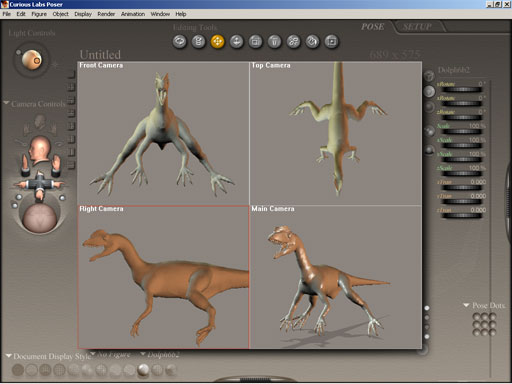
Start up Poser and clear the Pose room by selecting
Default Guy and deleting him. Click on
File>Import>Wavefront Object and use the browser to select
your model. On the Import Options popup menu, check Centered,
Place on Floor, set Percent of Standard Figure Size to 100, and Make
Normal Polygons Consistent. Once this is done, you should see
something like the image below. |
|
|
If you
produced your model in Organica by following the earlier tutorial,
you have a semi-grouped model with a group for the main body and a group for each of
the eyes. If you want to be able to keep the eyes posable,
you'll need to remove them from the model before Auto
Grouping. Export each eye to its own object file, then
delete them from the figure. This isn't as serious as it
sounds. You can restore your dinosaur's sight after you've
grouped the rest of the model.
|
|
|
Adding the
Bones and Adjusting the Zones
Now we’re going to enter the Setup room where we
will add a pre-existing skeleton from a similar figure, which we
will modify to fit our model. Click the
Setup tab along the top right of your screen. You will be
told that doing this will turn your model into a figure.
Since that’s the whole point of this tutorial, click on OK to
enter the Setup room.
Click on Window>Libraries>Figures>Animals
and select the Raptor figure. Click the Change Figure check
mark and the skeleton will be brought into the Setup room.
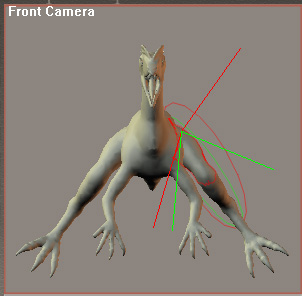
Use the editing tools to adjust the size, position, and
orientation of the bones to fit the model. Activate the
Joint Editor, check the box for Display Deformer, and look at the
green cross displayed for the joint's Center. If it's out of
line with the bone, click on Align and bear in mind that the limb
may need work later on. This is the case with the dinosaur's
thigh as is shown in the image below. Here, we are looking at
the side to side blend zones of that limb.
|
|
|
We’re going to
want a lot of flexibility in the neck so we’re going to add some
new bones between the two existing neck bones. The two
pre-existing bones are called "neck1" and
"neck2". To do this, select the bone neck1 in the
body parts menu and activate the Bone Creation Tool in the editing
tools section. Now, left click and drag to generate the new
bones. Open the Hierarchy Editor and double click one of the
bones you just created to give it a name and an internal name
consistent with the rest of the model. Repeat this until all
of the new bones have been renamed. Rearrange the
parent-child relationships in the Hierarchy Editor by clicking and
dragging the bones until everything is in the right order. The same process was repeated for the eight fingers (3 bones
each) and the six toes (3 bones each).
A bone was also added for the lower jaw, though this may be
replaced using morph targets at a later date.
|
|
|
Slicing and
Dicing - The Art of Grouping
If you produced your model in Organica by
following the earlier tutorial, you’re now ready to use the
Auto-Group function in the Grouping Tool. If you are using a
model that has already been grouped by body parts, and you want to
keep those groups, do NOT perform the Auto-Group step.
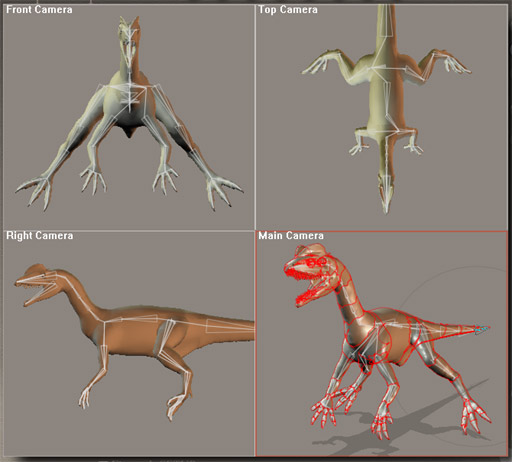
Activate the Grouping
Tool and click on Auto Group. Poser will automatically group
each of the model's polygons the nearest bone. This is a
good start, but there is almost always some cleanup involved where
you need to reassign polygons to the proper groups. You'll
also need to ensure that no polygons are assigned to more than one
group and that there are no ungrouped polygons. Remember
that the model will only bend between adjacent groups in the
hierarchy. If two adjacent sections of the mesh are
controlled by two non-adjacent bones, the mesh will tear when you
try to bend it. The first
attempt at grouping is shown below.
|
|
|
Re-Aligning
Off Axis Limbs
The ideal Poser
model has all of its body parts aligned directly on one the three
major axes (X, Y, or Z). This is done to prevent unnatural
distortion of the mesh when the figure is posed.
If you model has limbs
that are not closely aligned to the X, Y, or Z axis, the first step
is to try clicking the Align button in the Joint Editor and
readjusting the limbs Blend Zones. If this is not enough,
you'll have to realign the limb. This is done by saving the
figure to the Library so you can get it's skeleton later. I
saved mine as Dolph_Bones1(short for Dilophosaurus). Go into
the Pose room, select the limb you need to adjust, and rotate it
into alignment. In the case of my model, the legs were spread
out to prevent the mesh from glomming together in Organica. I
rotated the legs on the Z axis to bring them in vertical under the
body. Export the model as an object file, clear the Pose room,
and re-import the object file you just created. Enter the
Setup room, open the Library, and select the figure you just saved
(Dolph_Bones1) to get your skeleton back. Adjust the skeleton
to fit the re-positioned model and you'll be good to go.
|
|
|
Tweaking Your
Dinosaur
Now it's time to
start testing and tweaking the model until you're satisfied with
the way it moves. Do your testing in the Pose room. If
the model moves in some way that looks wrong, go into the Setup
room to readjust the blend zones.
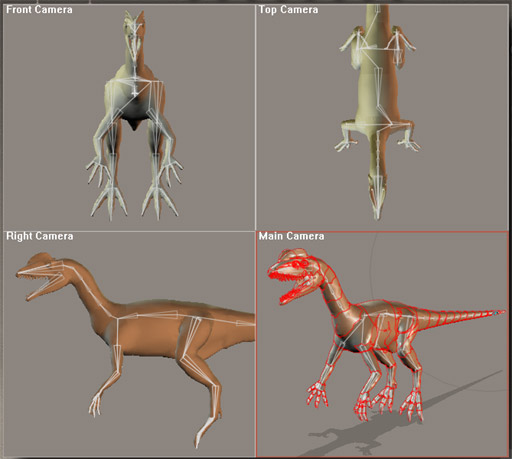
In my model, I
didn't like the way the original four boned raptor tail was
working, so I changed the tail to a twelve bone hierarchy and used
regular rotation orders instead of the curved orders. This
meant creating additional groups for the tail. The
re-positioned model with enhanced tail is shown below.
|
|
|
Giving your Dinosaur
the
Gift of Sight
If you had to delete
your critter's eyes prior to Auto Grouping, now is the time to
restore its sight. Add the current figure to the Library
so you can use the skeleton later. I called mine
Dolph_Bones2. In the Pose room, import the two eye objects you
exported earlier and move them into the correct position. The
eyes will be listed under Props. Select the figure and go into
the Setup room. Activate the Grouping Tool and click Spawn
Props once. In the Hierarchy Editor, make sure the eye props
are at the same level as the other props. Delete the original
figure and return to the Pose room. All of the groups should
now be listed under props. Export all of the props to an
object file, clear the Pose room, and re-import the object. Go into
the Setup room and re-insert the skeleton (Dolph_Bones2) from the
Library. Create a very small bone in the center of each eye,
parented to the head.
|
|
|
Cleaning Up
After Your Dinosaur
You'll want to do
some cleanup before you finalize the model and save it to the
Library. If you had to
change rotation orders on any of the bones, the parameter dials for
those bones are probably now labeled wrong. Double click on a
dial's name to change it or to set limits on how far a bone can
move. If there are dials you know you'll never need, you can
remove them using the Hierarchy Editor, but I'd be very careful
doing that.
When you're done,
you may have trouble importing the finished object file into
Bryce. For some reason, repeatedly exporting and re-importing
a model can cause Poser to produce out of range coordinates in the
final exported object file. This is easy to repair with UV
Mapper, which can automatically fix the coordinates.
Just open the file in UV Mapper, then save it out again without
changing anything.
|
|
|
The Rest of
the Picture
The picture at the start
of this tutorial, "Jurassic Jogger" was rendered in
Bryce. The file size was about 100 MB. There were 3
billion total rays with 9 billion total intersect attempts. The cycads were produced using Tree Professional 5 by
Onyx Computing. The distant tree line was made from a terrain
which originally came from Meski at the Poser Forum Online. |
|
|
Acknowledgements
I'd like to
express my appreciation to Tracy Ford at Prehistoric Times magazine
for his input concerning the appearance of dinosaurs. I'd also
like to thank the people at Poser Forum Online who took the time to
help me over some rough spots in this project. |
[RETURN TO TUTORIALS]
Copyright © 2001,
Carl E Schou, All Rights Reserved |