| Carrara Studio 3
Tutorial: Fun with Physics
Carl E. Schou
February 29, 2004
| |
|
The Continuous Cannon
If you have ever wanted a virtual cannon for
your computer, but didn't have the disk space for all of its
ammunition, then this recycling model is the one for you. The
animation shown above was made using the Physics engine in Carrara,
and it's the focus of this month's foray into the digital domain.
We will start with an overview of the Physics
Engine and some tips on keeping it running smoothly. We will
then outline the strategy used for this project before putting
together the animation. |
| |
|
An Overview of the
Physics Engine
The Physics engine in Carrara allows you to
take any object, give it an initial push and/or spin, then animate
the object's resulting behavior over time, with or without the
effects of gravity. All of the forces are applied at the start of the animation,
and the Physics engine does not work with Keyframes. However, once
the effects of Physics have been calculated for the animation, the
object's motion may be converted from Physics to Explicit to
generate Keyframes if desired.
You can also mix the motion modes for a group of
objects in an animation. For example, one object could be
using Explicit Keyframe motion, another object could be controlled
entirely by the Physics engine, and a third object could be
following a user defined motion path.
For this tutorial, we'll be using a Directional force to simulate
the effects of gravity. Other forces available in Carrara
include Torque, Point, Damping, and Flow. |
| |
|
Tips for Smooth
Running with the Physics Engine
Keep the Save Tweeners box checked to store the
output of the Physics engine. This will prevent the
recalculation of the physics unless something has been changed since
the last pass.
Once you have run the Physics engine through to the
end of the animation, uncheck the Physics Enabled box for the scene.
This will allow you to fine tune the arrangement of objects in your
scene without having to recalculate the physics every time something
was moved. Only turn Physics back on and rerun it if you made
a change to an object with Physics applied or anything else that
object might interact with.
Rewind your animation to the first frame before
moving any objects to avoid inserting unwanted Keyframes.
Physics calculations are slow, but can be sped up by
using low Effects Fidelity and Surface Fidelity when getting the
scene set up. Be aware though, that this can have an effect on
the accuracy of the object interactions. For example, objects may bounce off each other before they actually make contact.
Generally, use the low fidelity settings to rough in an animation,
and the high fidelity settings to fine tune it and make the final
renders.
Turn on Collision Detection, which may be found
under the View menu. This will help prevent objects from
falling through each other. It is also helpful to keep Physics
driven objects a tiny distance from the object they are
interacting with. For example, if you are going to animate a
sphere rolling across a plane, then start your animation with the
sphere a very small distance above the plain. If the surface
of the sphere and plane occupy the same space, they can be
interpreted as already intersecting which will cause the sphere to obey
gravity and drop down through the plane. You will also have
better results using a regular plane of limited size instead of the
infinite plane.
|
| |
|
Strategy for a Continuous Cannon
(1) Setup the scene with the stationary and moving objects, apply
Physics to the objects that will need it, and add a Directional
Force to simulate gravity.
(2) Check the alignment by moving any stationary objects blocking
the path of the moving objects so you will be able to get a clear
view of the moving objects' trajectories during a test run of the
animation. This is particularly necessary in this case because
the Physics driven object is starting the animation inside another
object.
(3) Check the interaction by returning the stationary objects to
their original positions and rerunning the animation..
(4) When everything is satisfactory, render the animation.
|
| |
|
Setting the Scene
We are setting up an animation where a cannon fires a cannonball
which travels in an arc in the XZ plane. The cannonball starts
the animation inside of the cannon, is propelled out the barrel,
then passes
through a curved pipe which redirects it back to the base of the cannon.
The animation is then looped, giving it the appearance of a
perpetual motion machine. For
reference purposes, the Carrara scene file I created for this
project may be downloaded from the Related Links section at the end
of this tutorial. This file is complete and ready to run. The
following instructions cover the procedures used to build this scene
and may be used to build up a similar scene from scratch. Whether
you design and build your own models for this project, or you
download and use the reference file, when your scene is set up, your
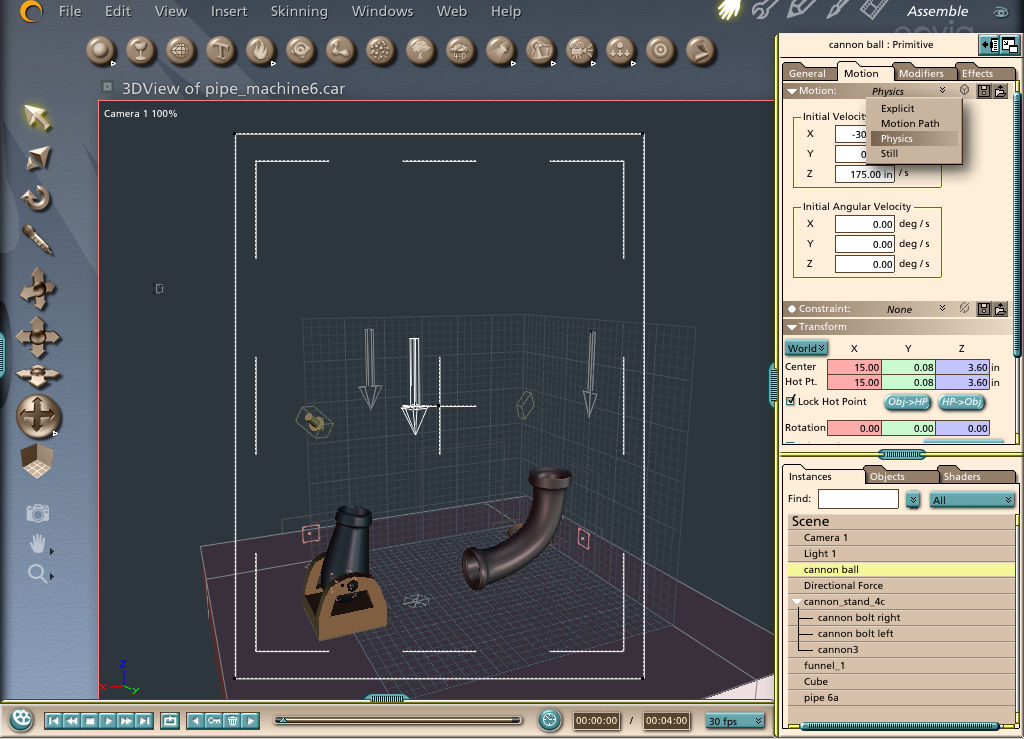
Assembly room window should look similar to the image below.
Though the cannonball is selected, it is not plainly visible since
it is sitting inside the cannon, ready for firing. Click on
the image to see a larger version in a new window. If it does
not open to full size, click on the magnification button that
appears in the lower right of the image.. |
| |
|
Once the scene is constructed, select
the cannonball and click on the Motion tab on the Properties tray.
Change the cannonball's motion type from Explicit to Physics, as
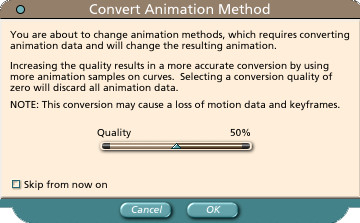
shown above. The popup window shown below will open.
Click on OK to accept the defaults. |
| |
|
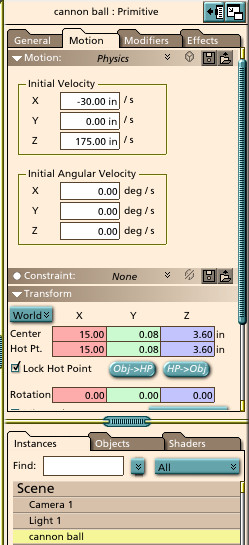
Set the Initial Velocity for the
cannonball under the Motion tab as shown below. This will
cause the cannonball to fire up at an angle in the XZ plane before
gravity causes it to fall back to earth. |
| |
|
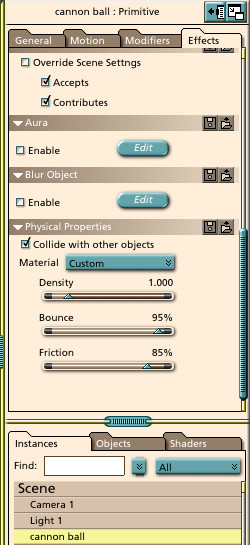
The Physical Properties of the
cannonball are set under the Effects tab as shown below. |
| |
|
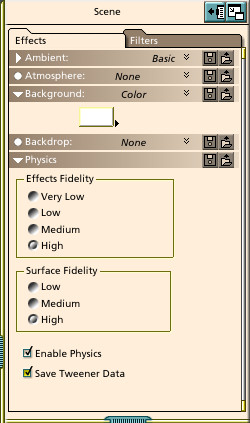
Select the Scene and check the Enable
Physics and Save Tweener Data boxes. You could speed up the
Physics calculation by setting the Effects and Surface Fidelity to
Low, but you'll get better results with these parameters set high as
shown below. |
| |
|
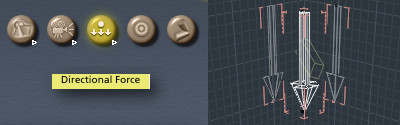
Now it's time to add some gravity to our
simulation. Click on the Directional Force icon (shown
highlighted below left), and drag it into the scene. You
should see the Directional Force helper object shown below right. |
| |
|
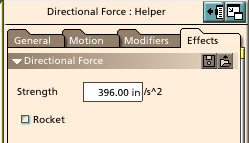
With the Directional Force selected, go
to the Effects tab of the Properties tray and change the value for
the Strength from 78.74 inches per second squared to 396.0 inches
per second squared as shown below. This will put you
close to the value needed to simulate the acceleration due to gravity. |
| |
|
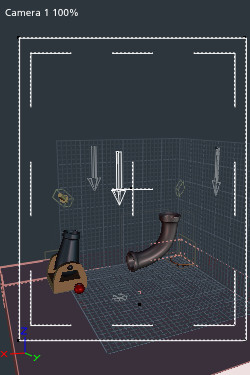
Check the Alignment
Now that the initial scene is set up, we are going to move any
stationary objects blocking the path of the moving objects. In
this case, the cannon and the pipe are moved 10 units in the -Y
direction as shown below left. By viewing the animation with
an Isometric camera, we will be able to align the stationary objects
with the moving object's trajectory in the XZ plane.
With the Scene selected, make sure the Enable Physics and the
Save Tweener Data boxes are checked in the Properties Tray.
Now run the animation and observe the trajectory of the cannonball
in the isometric front view. You will probably need to adjust the
angle of the cannon and the X position of the pipe to get the
objects lined up with the trajectories. Uncheck the Enable
Physics box before moving anything else in the scene. This
will let you replay the animation repeatedly without having to
recalculate the Physics. To avoid introducing unwanted
Keyframes, it is also important to rewind the
animation to the first frame before making any adjustments. When the scene is properly
aligned, it should look like the animated isometric view shown below
right. |
| |
|
|
Perspective View
|
|
Isometric View
|
|
Alignment Check
|
|
Alignment Check
|
|
|
|

|
|
| |
|
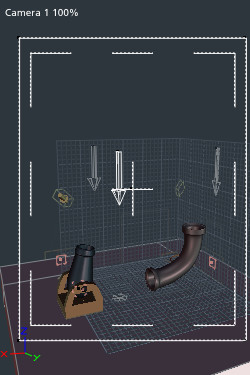
Check the Interaction
Once the scene is properly aligned in the XZ plane, we need to
restore the cannon and the tube to their original position on the Y
axis as shown below left. Note that the cannonball is no
longer visible since it is now sitting inside the cannon waiting to
be fired. Enable Physics and try rerunning the
animation. If everything works, the cannonball should exit the
cannon without hitting anything on the way out, it should enter the
pipe at the center of the top opening, and it should exit the pipe
and roll to the base of the cannon as shown below right. |
| |
|
|
Perspective View
|
|
Isometric View
|
|
Interaction Check
|
|
Interaction Check
|
|
|
|
|
|
| |
|
If things do not work quite right, then
disable Physics and check the animation from different viewpoints,
adjusting the position of objects if needed. Also, make sure the
Effects Fidelity and Surface Fidelity are both at the highest
setting. Imported models that are grouped with parent-child
hierarchies can give problems. The models made for this
project in Amapi had to be ungrouped, using only the mesh, before
things would work correctly. The friction and bounce of the
tube also had to be decreased before the cannonball would pass
through it smoothly. |
| |
|
Rendering the Animation
Enter the rendering room and open the Properties
tray. Set your preferences under the Rendering tab, select
Movie under the Output tab, pick the output file format you want,
then render away. |
| |
|
The Rest of the Show
The models of the cannon and the curved pipe
were built in Amapi Designer 7. The finished animations in
this tutorial used shaders from the Elite Metal Collection available
from Shaders3D, although these shaders are not present in the
downloadable Carrara scene file. Good
luck with this project, and try not to hit anything with it, or
you'll have to model another cannonball. |
[RETURN TO TUTORIALS]
Copyright © 2004,
Carl E Schou, All Rights Reserved |