| Making Waves in Photoshop
and Bryce
Carl E. Schou
July 27, 2001
|
|
Anyone who has ever used Bryce has
probably tried generating the surface of an ocean or lake by
applying a water texture to an infinite plane. This approach has
the advantages of being easy to implement, low on memory, and fast
to render. Using some of the Materials under the Waters &
Liquids menu can produce beautiful results, especially for a
placid lake or an ocean scene viewed from a distance. The
disadvantages of this approach become apparent in a close up view….real
water isn’t flat. If your goal is a more realistic view of ocean
swells, you’re going to need more than a bump map. You’ll need
to generate a 3D model of the ocean’s surface and that’s the
subject of this tutorial. |
|
|
This 3D ocean surface model is produced from an image file that
has been manipulated in PhotoShop so that it resembles an overhead
view of surf and it can be tiled seamlessly. This image file is
used as a height map in Bryce’s Terrain Editor to produce a slab
of ocean surface. The slab is duplicated and tiled out towards the
horizon. Two tricks that keep things from getting out of hand are
scaling down the resolution of the terrain slabs as the distance
from the viewer increases, and letting the ocean surface become an
infinite plane once it’s too far off to see the difference. |
|
|
Before beginning the modeling process, it’s always a good
idea to identify and list the characteristics of the real world
object you’re going to try to capture in your model. The ocean’s
surface has a lot of randomness. The spacing between wave crests
is roughly equal. The length of a wave crest varies, but it is
usually longer than the spacing between wave crests. For this
example, we’ll use a four-to-one ratio. The height of a wave
crest varies along its length. Water also has optical qualities
such as reflection, refraction, specularity, and transparency, all
of which can be handled by Bryce’s Material Lab. |
|
|
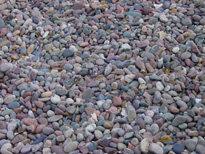
To begin, find a suitable source image
containing a lot of random elements and import it into PhotoShop.
I used a picture of river stones commonly used for yard cover in
Arizona. The original picture was 2048 by 1536 (see below left).
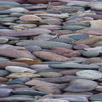
My final goal was a 2048 by 2048 tiling image made from a mirrored
1024 by 1024 image. The mirrored image would also be stretched by
a factor of four along its horizontal axis to simulate the wave
crests. I opened a new 256 by 1024 image. I cut and pasted my
original 2048 by 1536 image into the 256 by 1024 image and used
the Move Tool to frame an interesting portion of the original
image. When I was satisfied with the 256 by 1024 image, I
flattened and saved the image. Stretching was accomplished by
changing the Image Size of the 256 by 1024 image to 1024 by 1024
and saving the resulting image (see below center). |
|
|
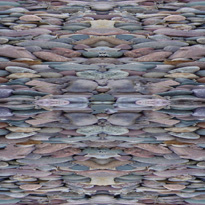
The 1024 by 1024 pixel stretched image was tiled by opening a
new 2048 by 2048 image and adding four layers. The 1024 by 1024
stretched image was cut and pasted into layer 1 of the 2048 by
2048 image. The stretched image was horizontally flipped and cut
and pasted into layer 2. The stretched image was vertically
flipped and cut and pasted into layer 3. The stretched image was
horizontally and vertically flipped and cut and pasted into layer
4. The Move Tool was then used to position layer 1 into the upper
left corner, layer 2 into the upper right, layer 3 into the lower
left, and layer 4 into the lower right. When satisfied with the
alignment of the tiled image, flatten and save it. You may need to
use the cloning or dodging tools to break up any long straight
dark or light areas in the final flattened image (see below
right). |
|
|
Now it’s time to fire up Bryce. Select
the infinite plane that comes up as a default. Set the family number to 2 and call it FlatWater.
Now create a
terrain. Set the family number of the terrain to 16 and call it
Water512. Apply the Deep Sea
preset material under Waters & Liquids to it. Press
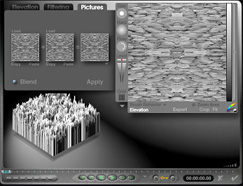
CTRL+E to enter the Terrain Editor. Select the Pictures Tab and
load the final tiled image you created in PhotoShop. Set the Grid to 512 and click on Apply (see below left).
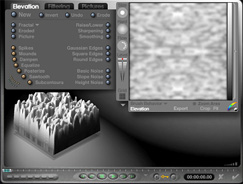
Now select the Elevation
Tab and press the Eroded button once. Then click the green check
mark on the lower right to accept the terrain data (see below
right). |
|
|
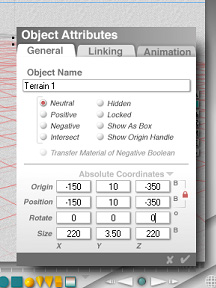
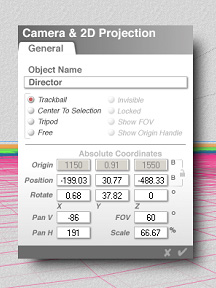
Set the position and size of the water
slab as shown in the picture at below left. Make sure you are in
Director’s view, double click the trackball, and set it as shown
in the picture at below right. |
|
|
Click the arrow next to Sky & Fog
and select Caribbean Clear. Since water is very reflective, its
appearance is affected by any kind of cloud cover. Once you are
satisfied with the appearance of the water and have finished the
tiling process, you can add clouds as needed. Now try a test
rendering of your first water slab (see image below). You may need to readjust the water slab in the terrain
editor. If it looks too rough, you can click the smoothing button
a few times. Wave height can be adjusted with the vertical gain,
which was set to 3.5 for this example. When you have something
that looks like water, save your work. Now select
the FlatWater infinite plane that was assigned to family 2 and
apply the Deep Sea
preset material under Waters & Liquids to it. This will
save you from having to tile the water slabs out to the horizon. |
|
|
If you’ve ever tiled a bathroom or
patio, the following portion of this project will be familiar to
you. Making sure that the Water512 object is selected, press
CTRL+D to duplicate it. Move the duplicate object by 200 in the X
or Z direction. Keep repeating this process until you’ve covered
the foreground with the high-resolution Water512 tiles. By moving
each tile a little less than its own dimensions, you are producing
a small amount of overlap to minimize any height variations at the
seams. When you’re far enough away from the director view, go
into the terrain editor and set the grid size to 256. Assign this
object to Family 18 and call it Water256. Continue the tiling
process with this object until the objects are far enough away to
be dropped again in resolution. Use the terrain editor to create
Family 19, Water128 with a grid size of 128. Tile with Water128,
then drop the resolution again to 64 by creating Family 20,
Water64. Keep monitoring your results by doing test renders.
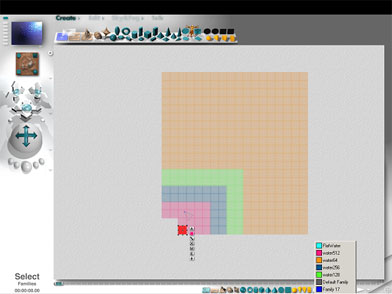
You
can stop tiling when you have gotten close enough to the horizon
that you can no longer see any difference between your 3D water
tiles and the FlatWater plane you created in Family 2. It's
a good idea to save your work at this point before you add
anything else to the scene. An overhead
view of the wireframe water surface is shown below, with the first
Water512 slab selected. |
|
|
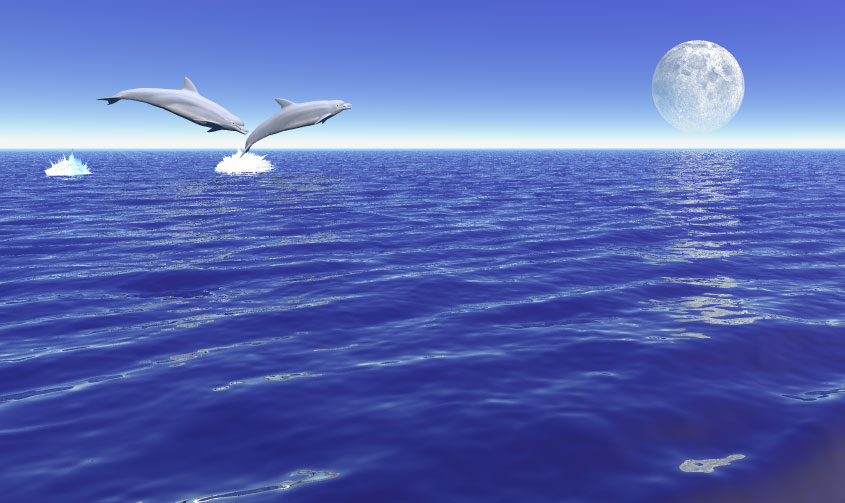
"Chasing the Moon", the image
at the top of this tutorial, was produced using this
process. The bottlenose dolphins are Poser figures, their
splashes were generated in Amorphium, and the moon was produced by
spherically mapping a flat lunar mercator map onto a sphere. |
|
|
So that about covers it. Next time
you're out and about with a digital camera in hand, start looking
for images that could be transformed into 3D surfaces using this
technique. You might wind up producing some wild surf, a
weird landscape, or some serious looking dragon hide. |
[RETURN TO TUTORIALS]
Copyright © 2000,
Authors Name, All Rights Reserved |