| Making Posable Models
in Poser5 or Poser4 Pro Pack
Carl E. Schou
April 30, 2003
|
|
ConeDogs at
Play
For this month's foray into the
digital domain, we are going to bring a model into Poser and make
it posable. The techniques described here will work with
Poser5 or with
Poser4 Pro Pack. The whole process will
probably take more than a single session at the computer, and it
is recommended that you save your work as you go. |
|
|
Posing
Strategy
(1) Beg, Borrow, or Build the model
you are going to make posable. (2)
Determine how the model will be split into groups. Name
these groups and use the same names for the Bones when they are
created.
(3) Import the model into Poser. (4)
Split the model into groups using the Grouping Tool and give the
groups the names determined in step 2. (5)
Spawn Props, export the model, apply UV Mapping if desired, then re-import
the model to Poser and turn it into a
figure. (6)
Build the skeleton by adding one Bone for each Group. Each
Bone has the same name as its given Group. (7)
Adjust the hierarchy so the Bones are arranged in a logical order. (8)
Adjust the Blend Zones and Joint Orders to get natural looking
bends between body parts. |
|
|
The Model
For the examples in this tutorial,
I'll be referring to the model of a ConeDog, which was built in
Organica out of deformed cone metashapes. The model in
Organica is shown in the screen shot below. The colors are
the defaults for the various metashapes. The final mesh that
was used for the model is visible in the upper right window of the
screenshot. This mesh was
exported from Organica as a DXF file. It was imported into
Amorphium3 to correct the normals, then it was exported as an OBJ
file before sending it to Poser. If
you are going to be using a complex model such as a realistic
human figure, it is recommended that all of the body parts be
oriented along the X, Y, or Z axis to minimize distortion in some
poses. This is why the 'natural pose' of most Poser figures
looks like they are getting ready for gym class. |
|
|
Determine the
Group and Bone Names
You can save yourself a lot of grief
later on if you decide on the group and bone names early on,
before you even import the model into Poser. If you are not familiar
with the Poser naming convention, it would be worth your while to
examine some of the models that are included with Poser.
Start with the more basic models like the snake and dolphin, then
work up to the more complicated models like the dog and the human
figure. This is also a great way to see how the models are
split into groups, how blend zones are set up, and how the model
parts are arranged in a hierarchy. For
the ConeDog project, we are keeping things simple. The root
body part is the Hip. If the Hip group moves, everything
else moves with it. Attached to the Hip are the left rear
leg and right rear leg groups. These will be called lrleg
and rrleg. Also attached to the hip is the Chest group to
which the left front leg and right front leg (lfleg and rfleg) are
attached. From the Chest group, we go the Jaw group, and
from there we go to the Head group. For the tail we have
three groups. Tail1 is attached to the Hip group, Tail2 is
attached to Tail1, and Tail3 is attached to Tail2. When we
do the actual grouping, there will be some illustrations that
should make this a lot clearer. The
reason for the lower case letters in the leg names is that Poser
will recognize these names as being left and right body
parts. This lets you use the Symmetry functions to save a
lot of work when setting up the model. |
|
|
Import the
Model into Poser
To begin, we will start up Poser and
delete the default Poser figure to clear the Pose room. Now
click on File > Import > Wavefront OBJ > and select
your model. In the dialogue that opens, select "place
on ground" and accept the rest of the settings.
Note that you can import other model
formats, but you will need to have the model in the Wavefront
Object format if you plan on passing it through UVMapper so that texture maps can
be applied later on. Even if you don't apply the mapping,
UVMapper is also very handy for fixing problems like out of range
coordinates which can cause massive headaches when you try to
import the models into programs like Bryce. |
|
|
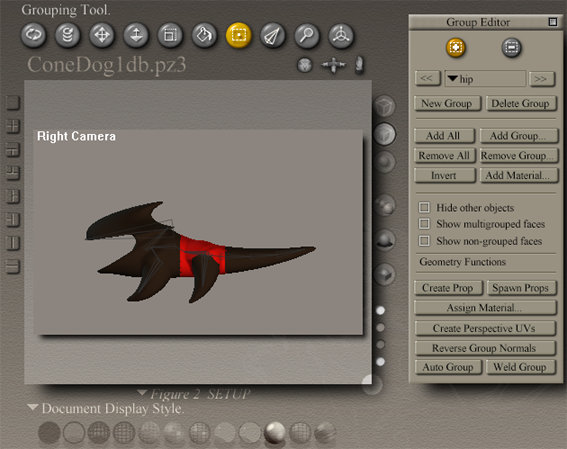
Group the
Model
Now we are going to enter the Setup
room and use the Grouping Tool to create new groups in the
model. We will then assign parts of the model to the
different groups. With the
model selected, click on the tab to leave the Pose room and enter
the Setup room. Click on the square icon to open the
Grouping Tool as shown below. Click on New Group and type
Hip into the pop-up window that opens asking for the new group's
name. Now left click and drag across the area you want to
include in the Hip group. If you select too much of the
mesh, then hold the Control key while left dragging to deselect it
from the group. Note that you can change the Document
Display Style to control whether you select both sides of your
selection area, or only the visible polygons. When you are
done with the Hip group, you should have something like the image
below. Repeat this process to create groups called
Head, Jaw, Chest, Tail1, Tail2, Tail3. The left and right
front legs will be called lfleg and rfleg. The left and
right rear legs will be called lrleg and rrleg. The
arrangement of all of the groups is illustrated in the next
section. |
|
|
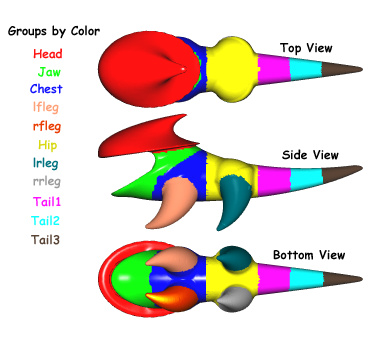
To illustrate how the model was split
into groups, a
different color was assigned to each group to produce the image
shown below. |
|
|
Spawn Props
and Export the Model
Next we re going to remove all parts
of the model except for the new groups that were just created,
then we are going to incorporate these groups into a new Poser
figure. At this point, you should have every part of the mesh assigned
to one of the groups that you just created. No parts of the
mesh should belong to more than one of the new groups.
Everything will still belong to the original group, but this group
will be deleted so it doesn't matter. If you are ready, then
save your work in case you need to return to this point later on. In
the Group Editor, select all of the old groups that you did not create
yourself in Poser and delete them. Press the Spawn Props button once,
then return to the Pose room. If you look in the Props drop-down menu under the main working window, you will see all of the
groups you just created listed as props. To turn this
collection of props into a grouped model, we will export it as an
OBJ file, then re-import it back into Poser. Click
on File > Export > Wavefront OBJ, and select "single
frame". In the Hierarchy Selection window, select just
the groups you created. Next, use the browser that opens to
give a new name to the file you are about to create.
Finally, in the export options box, check "include body part
names in polygon groups" and "weld body part
seams". Click OK and you are done with the exporting. If
you are planning on UV Mapping the model so that textures can be
applied later, this is an excellent time to do it. |
|
|
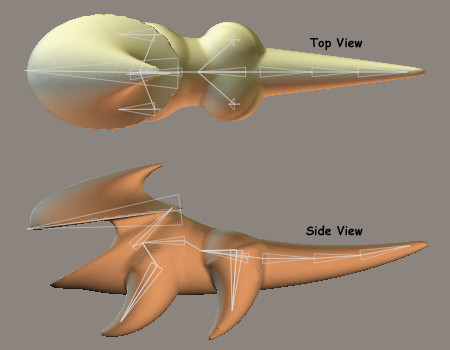
Re-Import the
Model and Add the Bones
Next we are going to re-import the
grouped OBJ file, turn it into a figure by entering the Setup
room, then add a bone to control each group.
Clear the Pose room by deleting any
figures, then re-import the OBJ file you exported in the last
step. With the model selected, enter the Setup room.
Switch to a top view and click on the Bone Tool. Now left
click and drag from the rear of the Hip group to the front of that
group. Switch to a side view and click on the Move Tool to
move the Hip bone into the proper position. Go back to the
Bone Tool and continue adding bones as shown in the top and side
views below. You can save
a lot of work by taking advantage of the symmetry function under
the Figure menu. Just concentrate on getting the bones on
one side of the body positioned exactly. After you have
named the bones, apply Symmetry to get the two sides to match. |
|
|
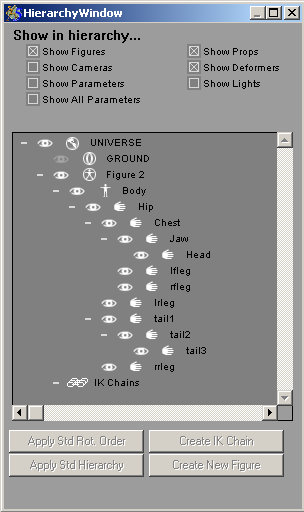
Arrange the
Hierarchy and Name the Bones
Click on Window > Hierarchy Editor
and a pop-up window should open similar to the one shown
below. A single click on a bone will select that
bone. A double click will open the Element Properties
window. Using this window, set the bone's name and internal
name to be the same as the group's name. Also make sure that
the Bend box is checked. Repeat this process for each bone
until your Hierarchy Window looks like the image below. |
|
|
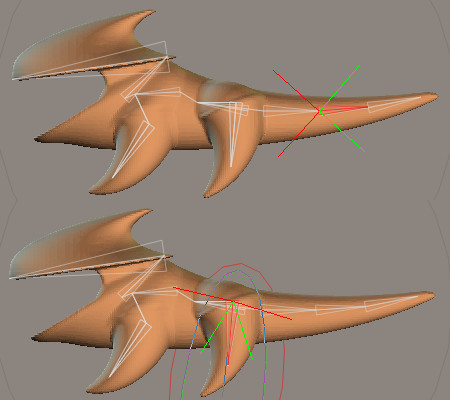
Adjust the
Blend Zones
Click on Window > Joint
Editor. In the pop-up window that opens, make sure that the
Display Deformer box is checked. In the first image below,
the Tail2 bone is selected and the xRotate deformer is being
displayed. The mesh between the red and green handles will
deform when the bone is moved. Do the adjustment of the
Blend Zones in the Setup room, then switch over to the Pose room
to see how moving the bone affects the mesh. You will also want to
check the other rotations from different views to ensure smooth
and natural bending for all of the poses you might give the model. Spherical
Falloff Zones were applied to all four legs. The left rear
leg was selected in the second image below. Again, check all
rotations from all viewpoints to avoid any nasty surprises. |
|
|
Checking
Things Out
Once you've gotten everything
adjusted, start trying to pose the model in every position you can
think of. You are sure to find things that still need
adjusting, and some problems won't be apparent until you've gotten
some use out of the model. |
|
|
The Rest of
the Picture
The picture at the top of
this tutorial, "ConeDogs at Play", was rendered in Bryce 5
using the same model that was covered here. The ConeDog
textures were painted using Deep Paint 3D. The landscape is a
Bryce terrain generated using an image of animal hide, and the plants
in the distance were created using XFrog. |
[RETURN TO TUTORIALS]
Copyright © 2003,
Carl E Schou, All Rights Reserved |