Making Reptile Skin in
Bryce
Carl E Schou
November 31, 2002
|
|
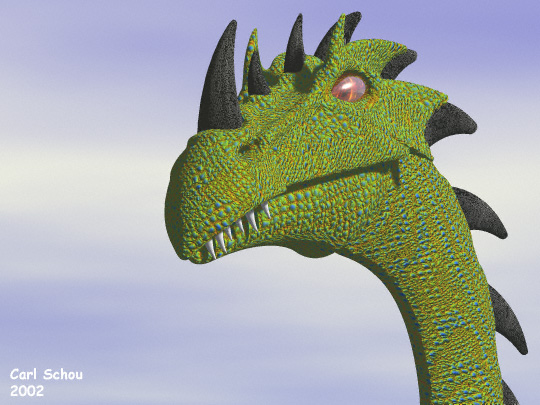
Gronk Discovers A Village
For this month's foray
into the digital domain, we are going to use the Deep Texture Editor
in Bryce 5 to create a reptile skin
procedural texture. Procedural
textures are responsible for much of the realism you see in Bryce
imagery, especially the landscapes. Because they are based on
mathematical procedures, you don't have to provide
image maps to make your textures. In the cases where
procedural textures can be used, they can save a lot of time and
produce very detailed and striking results.
|
|
|
When to Use
Procedural Textures
If your plans are to animate your model or to produce renders
from many different viewpoints, the best way to create a detailed
skin texture is to UV map the model, then produce texture maps
which can be applied to it. However, if you only want to produce
renders from a few viewpoints and you don't
want to spend a lot of extra time on UV mapping and texture maps,
then procedural textures may be a worthwhile option. Another
factor to consider is the complexity of the model's shape.
In general, procedurals work best when applied to basic
shapes. Since you are not tying your texture to a UV map,
the twists and turns of a complex model will produce distortion
when the texture is applied. A complex model can be split into basic groups, each
of which can be textured independently with procedurals. The
problem then is to keep the seams from showing at the junctions of
the groups. If your model is
very complex and you are planning on using a 3D painting program
like Deep Paint 3D for UV mapping and texturing, you can still use
procedurals from Bryce. Simply generate the texture on a
flat surface in Bryce, save the image, then load that image into
the painting program for use as a brush. Just remember to
tile the image or make it large enough so that you don't get the
hard edge of the image in the middle of a brush stroke. Ultimately, there are no hard and fast rules on
when procedurals will work. Every model is different, and
sometimes you just will not know until you try. |
|
|
Texturing
Strategy
(1) Import the model into Bryce, or
create a simple primitive to be textured. (2)
Apply a default texture resembling the desired final texture. (3)
Modify the default texture in the Deep Texture Editor. (4)
Fit the texture to the model by adjusting the Mapping Mode as well
as the position, scale, and orientation of the texture. |
|
|
Start With the Model
If you already have a model that you want to
texture, then import it into to Bryce. If the different
parts of the model are already split into groups, it will be much
easier to work with. The model of Gronk was built in
Organica and grouped in Poser with separate groups for the Head,
Jaw, Neck, Eyes, Teeth, and Horns. The UVMapper utility can also
be used for grouping.
If you only want to generate the texture at this
time and apply it to a model later, then create a sphere or cube and use
that as a base object for the texture.
|
|
|
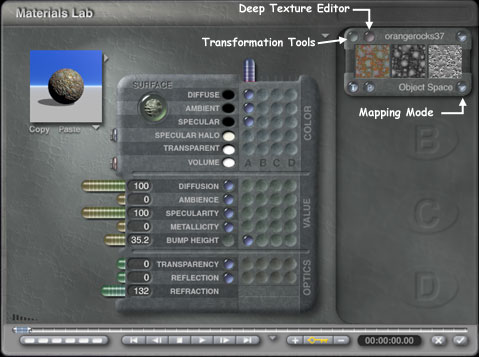
Apply the Default Texture
Let's get
started on the texture. Make sure your model or base object is
selected. Apply the Jewel Rock material by
clicking the arrow next to Edit in the top toolbar and go to
Miscellaneous, row 6 column 3. Press CTRL+M to enter the
Materials Lab and you should see something like the image below.
Labels have been added which point to buttons that we will use to
access the Deep Texture Editor, the Transformation Tools, and the
different Mapping Modes.
|
|
|
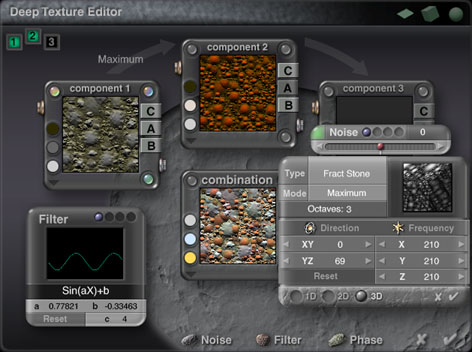
Modify the
Default Texture
Click the
button to enter the Deep Texture Editor. Along the bottom of
the screen, click the Filter button and the Filter control window
will open. Also click the Noise button at the bottom of the screen.
On the little pop-up that
opens, click the green tab and a Noise control window will open.
You
should see something like the image below.
|
|
|
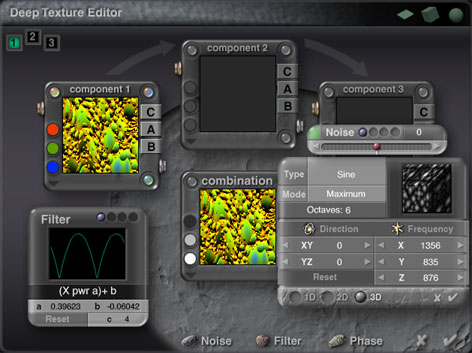
Now, start
changing the settings from the defaults shown in the image above to
the new values shown in the image below. When you're finished
changing the Noise settings, click the little check mark on
the Noise control window to accept the changes and close it.
The images in the boxes labeled Component 1 and Combination won't
match up until you've adjusted the Phase, and that's the next step. |
|
|
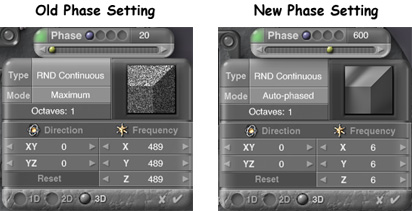
Click the
Phase button at the bottom of the screen and a little pop-up box
labeled "Phase" will open. Click the green tab on the pop-up
and a Phase control window will open as shown below left.
Change the settings to match those shown at below right.
When you're done, click the little check mark on the Phase
control window to accept the changes and close it. Next click the check mark at the lower right corner of the Deep Texture
Editor screen. You should now be in back in the Materials Lab
window. |
|
|
Fit the
Texture to the Model
Click the
button for the Transformation Tools and the pop-up window shown
below should appear. Depending on your particular model, the settings shown
are probably a good starting point. You can also select the Mapping Mode to
get the one which
best suits the geometry of your model. These are the tools
you will use to fit the texture to your model, and here is a brief
description of each.
Mapping Mode - this determines
whether the texture is applied to the model with a spherical,
cylindrical, cubic, or flat projection. It also lets you
lock the texture to the Object or to the World reference.
Size controls - these adjust the
scaling of the texture on the model. You can adjust the
overall size or you can independently adjust the size in the X, Y,
or Z direction.
Rotation controls - these adjust the
angles from which the texture is projected onto the model.
You have independent control of the rotation along the X, Y, or Z
axes.
Position controls - these adjust the
position of the texture independently along the X, Y, or Z axes.
|
|
|
Experiment to
See What Works Best
If you are
unfamiliar with these controls, the best thing you can do is to try
making a test render of your model or object and save the image.
Try varying just one of the controls and do another render to see
the effect. Save the image from this new render with a name
that describes what was changed. Repeat this process for
several values in each of the controls and do it for the different
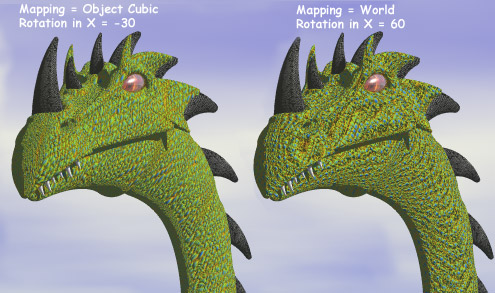
Mapping Modes. When you are done, you will have a matrix of
reference images to help find the best combination of settings to
get the look you want. The example below shows Gronk with two
different Mapping Modes and rotations on the X axis. The
head, neck, and body were all one group.
|
|
|
The Rest of
the Picture
For the picture
"Gronk Discovers a Village", the model was split into
separate groups for the Head, Jaw, Neck, Eyes, Teeth, and
Horns. The texture described in this tutorial was applied to
the Head, Jaw, and Neck. The values listed below probably
won't apply directly to your model, but it gives an idea of the
number of combinations possible in Bryce.
For the Head group,
Object Cubic mapping was used with a size of 256% in X, Y, and
Z. Rotation was set to -60 on the Y axis.
For the Jaw group,
Object Cubic mapping was used with a size of 161% in X, Y, and
Z. Rotation was set to -15 on the X axis. Position was
shifted -20 on the Y axis.
For the Neck group,
World mapping was used with a size of 366% in X, Y, and Z.
Rotation was set to 45 on the X axis, 60 on the Y axis, and -45 on
the Z axis.
The eyes textures were
produced by tweaking the Crystal Flames Material in the Complex FX
section.
|
|
|
Further
Explorations
This tutorial
only used some of the basic operations available in the Materials
Lab and Deep Texture Editor. In the Materials Lab, you can
have multiple channels controlling the different components in a
texture. You can also mix Procedural textures with image
files and use the results to generate materials.
In the Deep
Texture Editor, up to three components can be used. This
reptile skin texture only needed one component which made it a
good texture to demonstrate the effects of each of the
controls. Adding additional components produces hybrid
textures with a huge number of possible combinations.
Until next
time, happy rendering and please don't feed the dragon.
|
[RETURN TO TUTORIALS]
Copyright © 2002,
Carl E Schou, All Rights Reserved |