Ultimate UnWrap3D
Tutorial
Carl E. Schou
September 30, 2003
Page 6 - 3D
Navigation, Selection, and Grouping
|
|
Navigating and
Selections in the 3D Window
To navigate in one of the 3D windows, hold
down the Shift key and the Left Mouse Button (LMB) to zoom in or
out, CTRL and LMB to dolly left or right and up or down, and LMB
alone to rotate your viewpoint about the model.
To select a part of the model in the 3D
window, navigate to get a clear view of all the vertices or facets
you want to select. Press
the S key to toggle into 3D select mode.
Now use either the rectangular marquee or the free-drawing
lasso tool to make your selection.
If you need to remove parts of your selection, then hold
down the CTRL key and select those parts.
If you want to add to your selection, then hold down the shift
key and select the parts to add. Press the S key again to return to Navigation mode in the 3D
window.
|
|
|
Adding Groups
to a Model
To add a new group to a model, select the
faces that will belong to the group.
In the Scene Window at the right side of your screen, click
once on the word ĹGroupsĺ, so that it is highlighted.
Now press the Insert key.
A new group called Ĺuntitledĺ will be created,
containing all of the selected faces.
You would then right click on the word 'untitled' and
rename the group to something more descriptive.
Click here to see
to see the half size version of the new group illustration, or here
to see the full sized version.
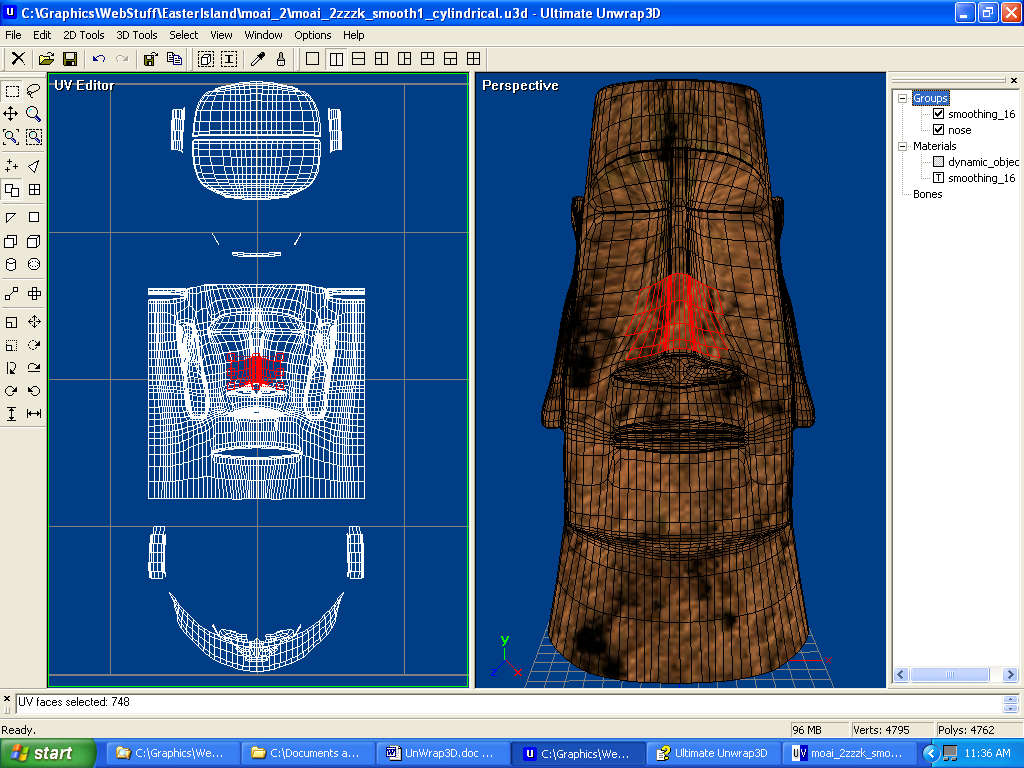
The image below shows the
Cylindrical with End Caps mapped model where a new group has been created for
the facets in the nose. Click on
the image to see a larger 1024 by 768 pixel version. |
|
|
Conclusion
UnWrap3D is a very handy and inexpensive
utility for anybodyĺs 3D ToyBox.
At 35 dollars US,
it is very low in cost considering all the tools it provides.
When you alter the UV mapping, UnWrap3D shows you the
effects of the changes on the model in real time, making the whole
process a lot easier to understand.
UnWrap3D is also very useful for adding groups to an
ungrouped model, and the selection process for grouping is a lot
less painstaking than what you experience using the Grouping Tool
provided by some other programs.
|
|
|
The Rest of
the Picture
The picture at the start of this tutorial began as an
illustration showing the mesh of the Easter Island statue model
before and after texturing. The untextured mesh was rendered
in Poser. The Cubic mapped model was rendered in Carrara
Studio 2. The texture
used for the statue on the right is a tiled variation of an image of one
of the huge Sarsen, or Standing Stones, at Stonehenge in
Salisbury, England, UK. A UK based artist and friend named Strike
photographed the Sarsen while vacationing with his wife, and I
processed the image through the TextureMaker program to produce a
series of seamlessly tiled images. My thanks to Strike for the
use of his fine image.
The backdrop of stars was produced with the
StarBits program, and the image was composited in PhotoShop.
|
[RETURN TO TUTORIALS]
Copyright ę 2003,
Carl E Schou, All Rights Reserved |