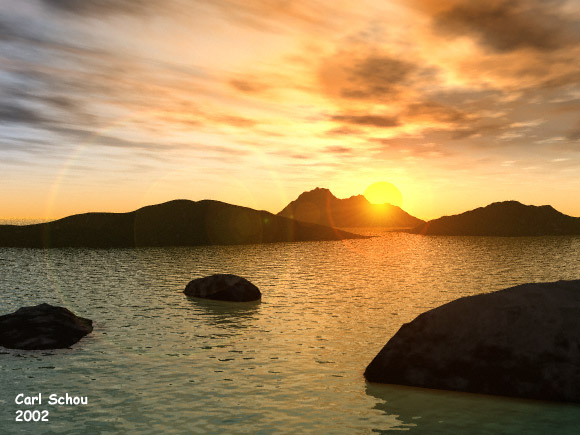
Seascape Creation in
Vue d'Esprit
Carl E Schou
August 31, 2002
|
|
Islands in
the Sunset
Vue d'Esprit is a
landscape creation package available from the E-on Software company.
It is known for its realistic 3D scenery and features such as
volumetric effects, glowing materials, lens flares, and "Solid3D"
terrain modeling. It is also known for the realism of its
vegetation and that will be covered in a future tutorial on
landscapes. For this month, we are going to start out with a
simple seascape. |
|
|
Strategy for a Seascape
Our goal here is to create a seascape
backlit by the setting sun, using default settings where we can. To
help get realism, we'll build the scene to scale. We'll start by creating
the atmosphere, the water, and the rocks in the foreground.
Next we'll add the islands in the background, adjust the position of
the sun, apply materials, and render the image. |
|
|
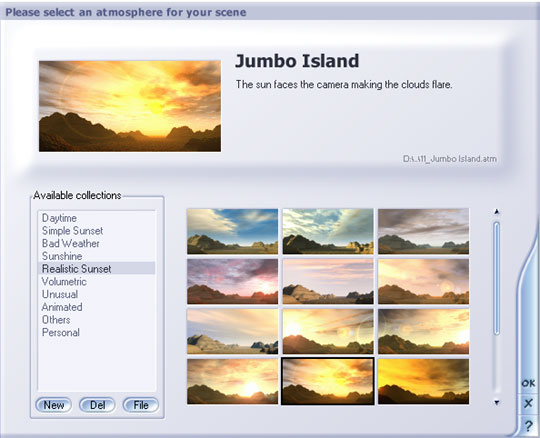
Give It Some
Atmosphere
The first
thing we'll do is open the atmosphere menu to select the sky we
want. This can be done by pressing CTRL+N to start a new scene
or by pressing the F5 key.
Select the Jumbo Island preset from the Realistic Sunset collection
as shown below.
|
|
|
Create the
Rocks and Islands
Next, create the water plane by
pressing the first button down on the left side of the
screen. Create three rocks by pressing the fifth button down
on the left three times. Arrange the rocks in the foreground
as shown below in the Main Camera view. For the first
island, create a terrain by clicking the third button down on the
left. In the Terrain Options pop-up that opens, enter 512 by
512 for the resolution and click OK. In the Terrain Editor,
apply some Diffusive erosion to get the
smoothed effect you'd expect in an island exposed to wind and
surf. Repeat for two more islands.
We're going to adjust the size and position
of the islands in the Top view, so make the Top view active by
clicking in that window. Zoom out using the toolbar's
Display menu until the objects are just tiny specks in the center
of the top view. Select the first terrain and scale it up by
moving the mouse over one of the squares at the terrain's corners
and dragging it out. Move the selected terrain to the upper
left in the Top view. Now repeat the scaling and moving
process on the other two terrains until everything is arranged as
shown below.
|
|
|
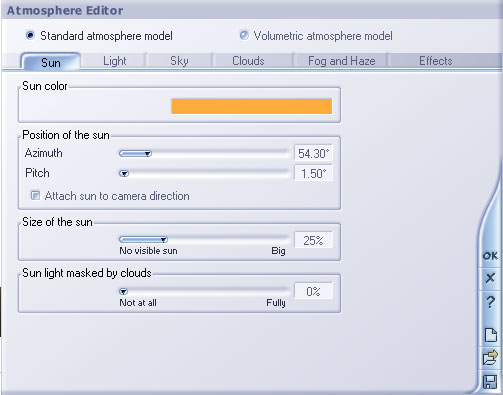
Adjust the
Sun
Press F4 to
open the Atmosphere Editor. Adjust the position of the sun
using the Azimuth and Pitch settings as shown below. The
numbers you use will probably be different depending on the shape
of your islands. Just get the sun into the general position
you want and be aware that you'll be probably be changing it after
a few test renders.
|
|
|
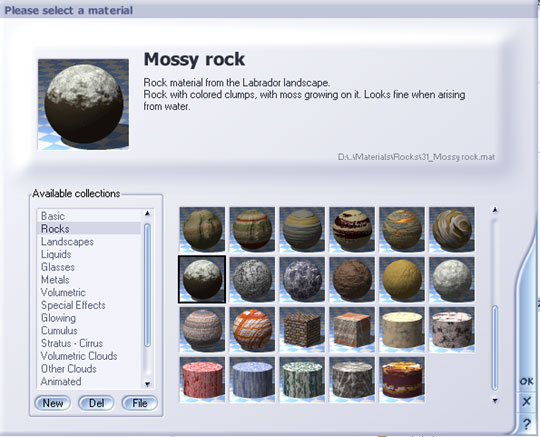
Apply the
Materials
Select the
first rock. Press CTRL+M to open the Material menu. Select
Mossy Rock from the Rock collection as shown below. Do the same for the other
rocks.
|
|
|
Select the
first terrain, open the Material menu, and select Scrubland from the Landscapes collection. Do the same
for the other terrains. Select the
water. Open the Materials menu and select Channel Water from
the Liquids collection. |
|
|
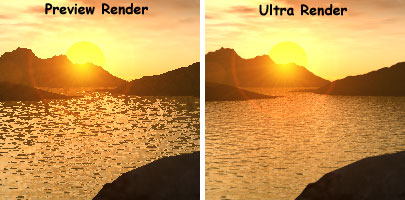
Render
the Image
When you're ready to
make the first render of any new scene it's a good idea to use the
low fidelity Preview Mode for a quick look. When you're
satisfied with the composition and lighting of the scene, you can
switch to one of the higher fidelity modes to produce the final
image. You can select the render options by pressing CTRL+F9
or by going through the Display menu in the toolbar. The two
200 by 200 pixel images shown below are cropped from 580 by 435
pixel renders. The Preview Render shown at below left took
21 seconds to render the full image. The Ultra Render at
below right took 7 minutes to render. The full image
produced with the Ultra Render is shown at the start of this
tutorial. |
|
|
Variations on
a Theme If you
want to dramatically change the appearance of your seascape, try
changing the clouds. Press F4 to open the Atmosphere Editor
and click on the Clouds tab. The Jumbo Island sky preset we
used has three layers of clouds. You can independently
adjust each layer, changing parameters such as cloud type,
altitude, density and cover. You can
also add or delete cloud layers and adjust the lighting to
come up with a nearly limitless range of custom skies. Other
atmospheric effects include full control over the light, the sky,
and a volumetric atmosphere model. |
|
|
Wrapping Up
That's it for this month's
installment. We'll
come back to Vue later for a look at landscapes and the
SolidGrowth vegetation. Until then, happy rendering. |
[RETURN TO TUTORIALS]
Copyright © 2002,
Carl E Schou, All Rights Reserved |